 Did we miss anything on this map? Is there something we didn't discover? Let us know!
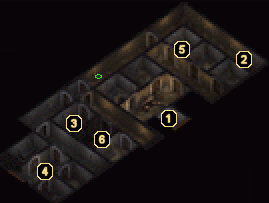
1 - Arrival
Did we miss anything on this map? Is there something we didn't discover? Let us know!
1 - Arrival
This is the entrance from the city streets of
Saradush. The first level of the prison is actually a crypt full of Vampires and Fledgling Vampires. Make sure that you have negative plane protection to avoid losing levels and a vial of Elven Holy Water, which you'll need for the quest at area #3. There are several secret and locked doors, but beyond that it is a pretty simple level.
2 - Restless Spirit
A spirit will materialize before you when you reach this area. The apparition wants to be put to rest, which can be accomplished by placing its skull (found in the nearby barrel) and its necklace (found at area #6) on the cot in area #3.
3 - Spirit's Resting Place
This is the resting place of the spirit from area #2. You must place his skull (from area #2) and necklace (from area #6) onto the cot here. He will once again materialize before you and you'll be prompted to sprinkle some Elven Holy Water on the ground. If you don't have any, go up to the Temple of Waukeen in
Saradush and purchase some. Once you've completed this task, the spirit will open the door at area #5.
4 - Exit
This exit leads down to
the second level of the Saradush Prison and is guarded by the Vampire leader Phlydian. Be prepared to fight at least a couple of Vampires within this room.
5 - Sealed Door
You'll be unable to open this door until you have put the spirit from area #2 to rest. Once you are able to enter, you'll be attacked by yet another Vampire. Once it's dead, search the cot for a
Bronze Ioun Stone, which is used in the construction of the
Circlet of Netheril.
6 - Spirit's Necklace
Search this room to find the necklace you need for area #3.


