 Did we miss anything? Is there something we didn't discover? Let us know!
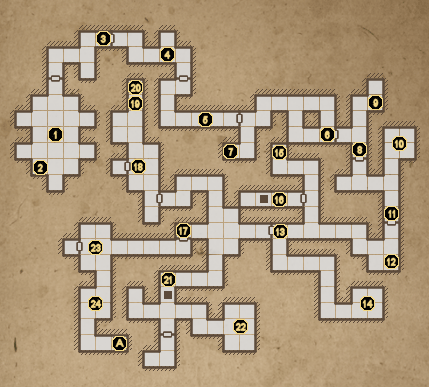
1 - Arrival
Did we miss anything? Is there something we didn't discover? Let us know!
1 - Arrival
You'll begin your journey in near-total darkness, and completely unarmed and unsupplied. Don't fret, the first level of the dungeon will provide you with what you need to keep going. Take a moment to move around the room and learn the controls before you proceed.
At the north end of the room, you'll find a locked door. Inspect the text on the east wall nearby for a clue on how to open it - pick up the torch. Simply remove it from its bracket on the wall to open the door, and give it to a character in your party for a (temporary) portable light source.
2 - Secret
Search the southwest wall of this room for a hidden switch (a small, loose piece of brick). Press it to open a hidden chamber to your south, which contains the Lurker Boots and a Shuriken.
3 - Gate
Use the hanging pull-chain next to this door to open it.
4 - Hallway & Supplies
There are a few things of interest in this hallway. First, search the floor of the nook to the north for your first armor - a Peasant's Breeches and Peasant's Tunic. Second, there's an alcove in the east wall, where you'll find your first weapon, a Cudgel. The door can be opened by pulling the switch on the wall nearby.
5 - Gate & Puzzle
In this hallway, you'll find your first true puzzle. The switch on the floor will open the gate ahead, but as soon as you step off, the gate will close. How to solve this problem? Simple - pick up any object, either from your inventory or the environment, drop it on the switch to hold it down. There's a Rock on the floor for just this purpose, although you may want to hold onto it for much later in the game, and use a Torch instead.
6 - Locked Door
Another locked door, but this one requires a key to open. Search the south nook just near the previous door (7) to find the Brass Key needed. When you've got it, simply select the key in your inventory and use it with the door to unlock it.
7 - Brass Key
Search this alcove for a Brass Key, which you can use to unlock the door at (6).
8 - Locked Gate
This gate is locked tight. Take note of the keyhole on the wall nearby - not all doors have locks directly on them. The Iron Key needed to open the gate can be found at (9).
9 - Secret Room & Iron Key
This hall looks like a dead end - but it's not. As the runic text on the wall informs you, you need to look for a "loose rock." Search the wall carefully and look for a small piece of brick that stands out, and click it to open a secret chamber containing the Iron Key needed to pass the gate at (8).
10 - Supplies & Giant Snail
In this room, you'll encounter your first enemy, a Giant Snail. Don't worry, these guys are pushovers, despite their ugliness. Right-click your party members' weapon icons (or bare fists) to attack the Giant Snail, and it'll go down with a few good hits. It's slow, so you should also be able to avoid taking too much damage by circling around it. The Giant Snail might also drop a Snail Slice, your first (and quite filling) food item. Yummy! Be sure to save it for later, when your party is actually hungry.
When the Giant Snail is dead, search the room's floor for use useful items - Leather Pants, Leather Boots and a Knife.
11 - Gate
Use the switch on the nearby wall to open this gate.
12 - Throwing Knife
The alcove in this wall holds your first Throwing weapon, a Throwing Knife. Note that ranged weapons, except for Bombs, can be retrieved after being used (although you'll have to kill the enemy you've attacked first). Be sure not to lose them!
13 - Locked Door & Giant Snails
This door is shut, and you'll need a key to open it. A couple more Giant Snails guard the area, so be ready for a fight. Try to take them on one at a time to avoid getting cornered. To open the door, you'll need the Iron Key obtained at (15).
14 - Supplies
This room is stocked with supplies, although you'll likely have to fight a couple Giant Snails to get them. Search the floor for a Baked Maggot (another food item), a Rock, some Sandals, and a Loincloth.
15 - Pit Puzzle & Iron Key
Another puzzle awaits you past the gate here (pull the chain to open it). You'll see a pit in front of you with a floor switch on the other side, and the runic text on the wall hints that "something needs to fly" to bridge the gap. Simply take a Rock or other item and throw it (either by using it as a weapon or dropping it on the upper portion of the screen), and it will land on the floor switch, closing the pit up. Walk across and grab the Iron Key from the alcove, which you'll need for the door at (13). Don't worry if you fall down the pit - you'll end up in an enclosed room a floor below, but a teleporter will take you back up.
16 - Supplies
Check the end of this hallway for a Rock and some Pitroot Bread (food).
17 - Locked Door & Blind Statue
At the end of this room you'll spot a demon-like face sticking out of the wall, with a locked door nearby. Check the wall to find the message "heal my sight", which is a useful clue on how to proceed. You'll need the two Blue Gems found at (18) and (21) to solve the puzzle.
Once you have the Blue Gems, take them from your inventory and drop them into the statue's eye sockets. The door will slide right open, revealing a new enemy, the fearsome Skeleton Warrior! The Skeleton Warrior is heavily-armored and does more damage than any other enemy you've faced, but your party, now better-equipped, should be able to put up a good fight. Note that the Fireburst spell found at (23) can help quite a bit. When it's dead (er, re-dead?), be sure to grab the Legionary Spear and Shield it drops - the Shield will keep your front-line Fighter alive, and the Spear can be given to a party member in the back row of your formation.
18 - North Chamber & Blue Gem #1
In this northern chamber, you'll come across a new enemy type, Herders. Herders are basically giant mushroom creatures. They're a bit faster and hardier than Giant Snails, but still not a terrible threat. However, you will have to fight off four of them in this room, so keep on guard. Note that they may drop a new food item, Herder Caps.
When the Herders are dead, turn your attention to the Blue Gem in the small prison cell. To open the gate, use the lever on the wall at the north end of the room (19). Grab the Blue Gem from the floor, and take note of a wall switch inside - pressing it opens a secret room at (20).
Before you leave, inspect the floor around this area for a couple new items - two Grim Caps (food), and a Tar Bead, a plant used to create potions.
19 - Lever
Pull this lever to open the gate at (18).
20 - Secret Room
Inside the Blue Gem's cell at (18), you'll find an obvious switch on the wall. Press it to open the wall at the north end of the area. Inside, there's a Dagger, Tar Bead and two Cave Nettle plants waiting for you.
21 - South Chamber & Blue Gem #2
To the south, you'll find another area to explore. To reach it, use the lever on the entry hall's wall to seal up the floor pit (the pit will take you down to Level 2, where you'll fight a Giant Snail and can collect a Rock and Peasant's Cap, but the gate prevents you from exploring further). The South Chamber is littered with Giant Snails, so take them out one-by-one.
Past the gate at the south end, you'll find the second Blue Gem on the floor, guarded by another Giant Snail. Destroy it and grab the Gem.
Leaving this room is itself a puzzle, you might notice, as stepping on the switch causes the gate to close. How to open it? There's actually two ways. You might notice a hidden switch on the wall, which will open the door - you can hold the floor switch down with an item (even the Blue Gem), then press the button on the wall and step through the gate (you can grab the item you left on the floor as you leave). The second way involves dropping an item on the floor switch on the other side of the gate, through its bars, while standing on the one on your side.
22 - Supplies & Scroll of Fireburst
This small chamber contains some useful supplies - a Tattered Cloak, another Loincloth, a Rock, and, the alcove, a Scroll of Fireburst. This Fireburst spell requires a Mage party member to cast, and, using the rune shown in the scroll, will deal a substantial amount of damage to any enemy directly in front of you. Not bad!
23 - Iron Door
You'll soon come across an imposing-looking
Iron Door. These Iron Doors are a little bit special - there are ten of them in the game, and each requires a different method to open. As the scroll in the nearby alcove suggests, you'll need to "use your wits" to open them. Please see our Iron Doors page for more details on all of them.
This one can be opened fairly easily, however. There are two hidden switches on the walls of this room, one on the northwest end and the other on the southeast. Press both of them and the Iron Door will open, revealing a Whitewood Wand, a useful item for any Mage in your party.
24 - Crystal of Life & Scroll of Poison Cloud
This room contains a large, glowing crystal. As the helpful scroll nearby tells you, this is a Crystal of Life - upon activating it, your entire party will be revived and fully healed, and your game will be saved. You'll come to love these mystical stones in the near future.
Heading out of the room, be sure to check the alcove in the wall for another spell scroll, this one explaining Poison Cloud. Poison Cloud does less direct damage than Fireburst, but has the added benefit of causing lingering damage over time, and the cloud hangs in the air for several seconds.
Congratulations, you've finished Level 1 of Mount Grimrock's dungeon! Proceed down the hallway to (A), and take the stairs down to
Level 2 - the Old Tunnels.
A - Stairs Down to Level 2


