 Did we miss anything on this map? Is there something we didn't discover? Let us know!
The requirement for beginning these non-optional "Loose End" areas is simply beating one more planet after finishing Onderon. In the walkthrough, that planet would be Nar Shaddaa. After this requirement is fulfilled, you will receive an urgent message back at the Ebon Hawk from Kelborn on Dxun asking you to meet with him as soon as possible.
Did we miss anything on this map? Is there something we didn't discover? Let us know!
The requirement for beginning these non-optional "Loose End" areas is simply beating one more planet after finishing Onderon. In the walkthrough, that planet would be Nar Shaddaa. After this requirement is fulfilled, you will receive an urgent message back at the Ebon Hawk from Kelborn on Dxun asking you to meet with him as soon as possible.
Take the Ebon Hawk to Dxun, and then the Mandalorian Guide at Jungle Landing (#2) back to the Mandalorian Ruins to speak with Kelborn. You will automatically begin conversation and subsequently have to break your party up into two teams, each taking on a different objective.
The first objective is the Jungle Tomb and Sith Tomb on Dxun. You'll get to pick one "leader" and I recommend Visas for the role, and an additional two party members. Other than Visas, I'd recommend picking your two strongest characters of the ones you are allowed. If you are a Dark Side character, I strongly recommend Hanharr, as he's easily the toughest party member you have and the upcoming battle is the most challenging (and fun) multi-opponent battle of the game. Mandalore is also a great choice. Your character and Kreia are saved for the next part, which will be explained after the Sith Tomb.
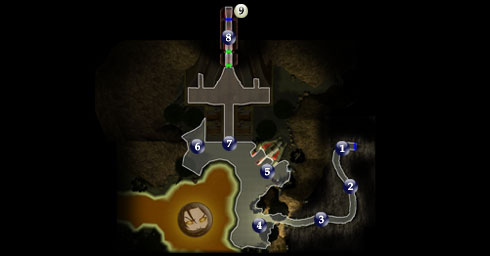
Your main goal is simple yet challenging to complete: enter the Sith Tomb at #9. There are three possible ways you can make the huge battle at #7 and beyond easier. One is to rewire (using Repair) the Turret Power Generator at #4 to explode. The big one is to activate the "foothold" scenario at the console at #5, which turns the six turrets at #7 onto the Sith, provided you have enough computer spikes. You can do one or the other, but not both. Finally, preferably while in Stealth, rewire the Droid Power Generator at #6 to explode. This will disable the droids at the top of the ramp past #7. If any of these three are done, you should have an easier time. If not (like in my first game), you may start getting flashbacks to the Star Forge in the first game, as it will be pretty intense but also very fun and challenging.
1 - Arrival
Ahead, expect some Boma.
2 - Three Boma Beasts
This should be a fairly short battle.
3 - Mines & Perimeter Sensor
Here you can set someone (other than Bao Dur due to his remote droid) in Solo and Stealth mode to make it past the mines (disarming or disabling on the way if you have Demolitions), and then use Repair (or enter the codes Bao Dur gives you on) the perimeter sensor to disable it, thus preventing more Sith from seeing you at #4. Don't worry if you want to simply charge ahead, as after the first battle at #4, you will be able to rest to recovery.
4 - Turret Power Generator & Sith Troops
If you set of the mines or the Perimeter Sensor, there will be a few Sith Elite Troops here for you to deal with first. Afterward, you can pick a party member with the Repair skill and rewire the Turret Power Generator to explode, thus preventing any turrets at #7 and beyond from joining the battle against your party. Optionally, if you have many programming spikes, you can access the console at #5 and use the turrets at #7 to attack the Sith instead... which will make the battle much easier.
5 - Sith Camp
Fight off the Sith, loot the containers and check the console here. Provided you have enough programming spikes, you can activate the "foothold" scenario, which turns the turrets (if not already offline at #4) on to the Sith instead. This is the best option for making the battle easier, if that is what you want. You may simply want to charge in for a good challenge, however, as these types of battles are few in the game.
Before heading to #7, optionally put a character in Stealth mode and sneak past #7 to the #6 Droid Power Generator.
6 - Droid Power Generator
Like at #4, you can rewire this generator to explode using your Repair skill. Once done, the war droids at the top of the ramp will offer you no resistance.
7 - Sith Battle Extraordinaire
This is one of the few opportunities to see how powerful your characters really are. Massive amounts of all types of Sith are guarding this ramp and are waiting at the top of the ramp, along with war droids, defense turrets and even Dark Jedi Apprentices. Keep your characters together, focusing on nearby enemies before moving too far from one another. This helps especially with healing and spreading out the damage. Your most resilient character should ideally be the first to plow forward.
If one character gets too far away, those opponents that are closest will gang up and the character will probably be over matched. Great Force Powers to use here are Battle Meditation, Speed of course, Energy Resistance, and any mass damaging power such as Force Wave or Storm. Activate your characters' energy shields and if any character is in trouble, use stimulants as well.
If you utilized any of the support measures described earlier, the battle will prove less difficult. When finished, loot the containers in the alcoves on either side at the top of the ramp, and then enter the door. Two Lieutenants await past the first door, and at #8, another surprise.
8 - Two Sith Lords
This will be your first encounter with the Sith Lord, but not your last! Concentrate on one at a time and then finally exit at #9.
9 - Exit
Exit to
Sith Tomb (#1).


