 Did we miss anything on this map? Is there something we didn't discover? Let us know!
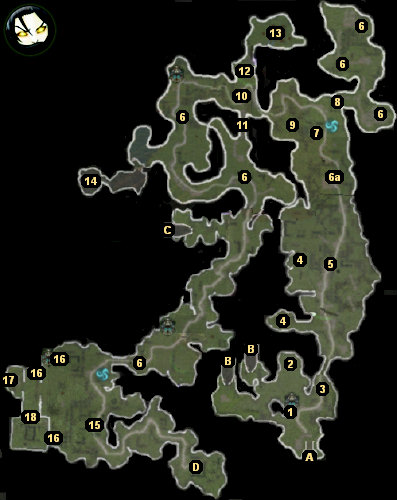
1 - Esselte
Did we miss anything on this map? Is there something we didn't discover? Let us know!
1 - Esselte
If you talk to Esselte, she'll teach you the
lesser chant of fortification (Chant 1).
2 - Abandoned Tower
If you pull the lever in the tower, an elevator will take you down to a room with four sanctuary
doors. Each sanctuary door requires level 3 in one of the four skill areas (one door for each
skill area), and behind each door you'll find a treasure chest. Generally speaking, treasures
found behind sanctuary doors are good for the characters who can open the doors, but in this case
it's so early in the game that you probably won't find anything exciting.
Also underneath the tower, you'll find the
lesser chant of dexterity (Chant 2).
3 - Dryad Outpost
The dryad outpost is involved in the
Prisoner of War quest. You won't be
able to pass through the outpost until you've completed that quest.
4 - Statue
When you twist the statue, a chest will rise up out of the ground.
5 - Morden Checkpoint
If you're polite to thug leader Greknev at the checkpoint, then he'll tell you the password "Chaba"
that you can use at the upcoming Morden Tower (#6a). Of course, the password is a trap, so if you're
not polite to Greknev, it doesn't really make a difference. The Morden at the checkpoint will
eventually turn hostile towards you regardless.
6 - Morden Towers
The Morden towers are involved in two quests:
The Morden Towers and
Finala's Contempt.
At the first tower (#6a), you'll meet a Morden captain. If you received the password from the Morden
checkpoint (#5), then you can relay it to the captain, but it won't make any difference. The password
is a trap, and the Morden near the tower will attack you as soon as you've said it.
After you've defeated the Morden, you can free a dryad named Nen from a nearby cage. Nen will reward
you by telling you how to blow up the Morden towers: simply click on the broken cage to create a
cage fragment, then pick up and equip the
cage fragment, then click on the campfire
to light the
cage fragment, and then click on the tower to set it on fire. The tower will
explode, unblocking the way so you can continue north.
7 - Platform
On the platform you'll find two lecterns -- one for the
lesser chant of intelligence (Chant 3)
and the other for the
lesser chant of strength (Chant 4).
8 - Wall
The wall will block your way until you've picked up the secondary quest
Finala's Contempt, and you won't get that quest until Act Two.
9 - Abandoned Tower
If you pull the lever inside the tower, a chest will rise up out of the ground.
10 - Morain
When you approach this spot, you'll witness a cut scene where a dryad named Morain will accuse a
Hak'u of kidnapping her niece Tanzi. The Hak'u will then strike Morain down but not kill her.
When you talk to Morain, she'll ask you to rescue Tanzi. If you agree, then you'll receive the
secondary quest
The Hak'u,
and Morain will leave for the Eirulan infirmary
(
Eirulan, #10).
11 - Collapsed Bridge
The bridge will collapse before you can reach it, forcing you to take the long way around.
12 - Health Shrine
13 - Hak'u Ritual Camp
The camp is involved the secondary quest
Taar's Investigation.
14 - A Tranquil Cave
Inside the cave you'll find a spirit (see the
Spirits of Aranna quest for details), plus a lectern containing a
mysterious chant (Chant 5).
The chant creates a random low level object.
15 - Dryad Outpost
You won't be able to pass through the outpost until you've completed the primary quest
The Morden Towers. Inside the outpost, you'll find a lectern with the
lesser chant of
fighter health (Chant 7) on it.
16 - Lecterns
At these three lecterns, you'll find the
lesser chant of casting (Chant 6), the
lesser
chant of mage health (Chant 8), and the
lesser chant of ranger health (Chant 9).
17 - Spirit
This spirit, like just about every spirit, is involved in the
Spirits of Aranna quest.
18 - Locked Door
You won't be able to go through this door until you've picked up the secondary quest
The Hak'u, Part II.
Exits:
- Lift to
Eirulan.
- Entrance to the
Hak'u Caves.
- Entrance to the
Hak'u Caves. This entrance starts out blocked by a gate, and you won't be able to go through until you've accepted the secondary quest
The Hak'u.
- Entrance to an
Elven Shrine.


