 Did we miss anything in this section? Is there something we didn't discover?
Let us know!
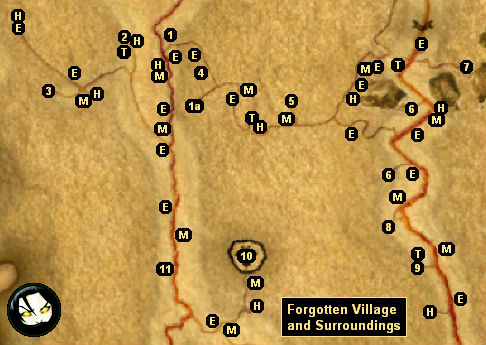
1 - Forgotten Village
Did we miss anything in this section? Is there something we didn't discover?
Let us know!
1 - Forgotten Village
You won't find much to do in the Forgotten Village (#1), and the people there won't exactly seem thrilled to see you. If you talk to Old Barkin, he'll rant about a sacred grove and a treaty, and he'll ask you to go away. This conversation is the trigger for the quest "The Web of Fear."
There's a spot to the south that looks like it might be a sacred glade (#1a), but the area that will actually update the quest is the old fort to the west (#2). If you go there, you'll encounter a single giant, and then if you return to the village, you'll find four other giants attacking it. As far as we're aware, there isn't any way to save the village, so the only thing the quest is good for is to give you lots of free loot, both from the corpses of the giants and peasants, and from the chests in the now-empty houses of the village.
2 - Eagle's Head Fort
You'll encounter a giant here.
3 - Capuchin Cave
You'll find undead creatures and treasure chests inside the cave.
4 - Ram's Cave
This is one of the tougher caves in the game. You'll find lots of big and nasty demons inside, and while demons are easy enough to kill when you're facing them one at a time, you'll typically find them in groups of two or more in the cave, and so you'll probably die a lot. But the demons will drop
Headless Hearts and
Winged Demon Eyes, and so it's worthwhile to clear out the cave even if you get beat up in the process.
5 - Western Thalmont Node
This is one of the nodes where you can talk to your sister Kira. See the quest entry for
Meet Kira in the Other Node for more information.
6 - Huts
These huts are marked on the map, but they're not involved in any quests, and there isn't any way to get inside of them. You might find an ogre at the southern hut.
7 - Silver Plate Cave
This cave is involved in quests from
Tharbakin and the
Excavations. You'll receive the password to enter the cave from the
Excavations.
8 - Graveyard
9 - Ho's Hut
You'll need to speak with Ho to complete a quest in the main quest line.
10 - Earth Claw Tower
You'll face necromancers and undead creatures at the tower. The necromancers will only cast Poisoned Dart at you, so as long as you have poison immunity, you should be able to mop the floor with them.
You'll recieve a quest to clear out this tower in
Four Stones Village.
11 - Four Oaks Cave
You'll encounter dozens of skeletons but no treasure chests inside this cave system.
Other Places of Interest:
| E | Enemy (Bandit / Grom / Orc) Camp
|
| H | Health (Maliel) Shrine
|
| M | Magic Source
|
| T | Teleporter
|
| $ | Treasure Container
|


