 Did we miss anything in this location? Is there something we didn't discover? Let us know!
Area Note
Did we miss anything in this location? Is there something we didn't discover? Let us know!
Area Note
Custard Mansion was almost completely reworked in the Dungeon Lords Collector's Edition. This
section reflects the new version. If you're playing a regular version of Dungeon Lords, then
you should refer to the Custard Mansion section.
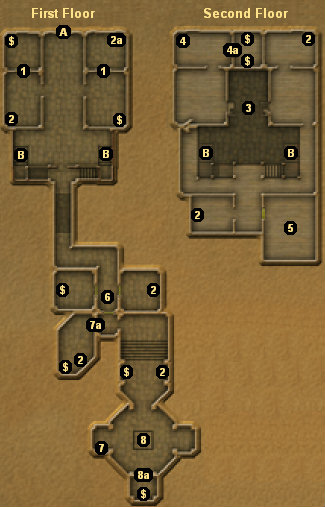
1 - Sliding Doors
These doors will open on their own, but only after you've defeated the demonic entity upstairs
(#5).
2 - Mimics
Just like all good mimics, the mimics in Custard Mansion look just like a treasure chests -- until
you click on them to disarm them, and then they'll spring up and attack you. Mimics get melee and
fire attacks, so just block and damage them as best you can. One of the mimics (#2a) will drop a
cellar key when it dies. You can use the
cellar key to unlock a trio of cellar doors
(#6).
3 - Jump
In order to get to the upstairs bedrooms on the western side, you'll have to leap across the
broken floorboards here.
4 - Blood Candle / Button
You'll find a
blood candle on the table here. You can use the candle to summon a
demonic entity (#5). There is also a button high on the wall here. (If you stand on the
table, you should be able to spot the button easily.) The button opens the secret door to
the east (#4a).
5 - Demonic Charm
You'll find a demonic charm in the center of the room. To invoke it, you'll need to place the
blood candle (#4) in it. When you do, a demonic entity will appear above the charm and
attack you. The demonic entity is basically a specter, and it'll spray you with a variety of
spells. If you're a melee fighter, then the most difficult thing about the battle might be jumping
up onto the charm so that you can hit the entity. But the entity doesn't have very many hit points,
so regardless of your character type, just plug away at it until it is dead. The entity won't drop
anything when it dies, but its death will trigger the sliding doors on the first floor (#1), and
they'll now open when you approach.
6 - Locked Doors
The three doors here can be unlocked using the
cellar key (#2a). The eastern and western
doors can also be picked.
7 - Loose Brick
You'll find a loose brick high on the wall here (#7). Some characters can jump from the ground and
hit the brick at the apex of their leap, but other characters can't, and it doesn't appear to have
anything to do with the Athletics skill. So to be safe, you should jump onto the crates below
the brick, and then jump onto the molding of the wall. From there you should be able to hit the
brick no matter what. The loose brick will open the secret door near the entrance to the cellar
(#7a).
8 - Chest
When you open the chest, you'll reveal Urcula's head, and the secret door to the south (#8a) will
open, allowing Urcula's body to attack you. Urcula's body hits hard but is slow, so you can let
it chase you around the chest, stopping every so often to hit it with a ranged attack. Chances
are, at some point the body will get stuck trying to chase you, and then you can just stop and
ping away.
When Urcula's body dies, it will drop the
Custard treasure map that you'll need for the Guild
of Mystery quest. However, Esmerelda's ghost will then appear and attack you. Esmerelda has a
ranged cold attack, but if you block when she uses it, you won't get frozen. Esmerelda (and all
banshees) are invulnerable to ranged attacks, and they tend to float high enough to make it
difficult to kill them with melee attacks. So the best thing to do is zap them with spells. If
you have a bunch of fireballs, shrieking stars, and magic missiles, that should do the trick,
even if you're not skilled with arcane magic.
Note: If you're stuck with melee attacks only, then move through the doorway south of the chest.
For Esmerelda to follow, she'll have to lower herself enough to come within range of your weapon.
Exits
- Front door.
- Stairs between the first floor and the second floor.


