 Did we miss anything in this location? Is there something we didn't discover? Let us know!
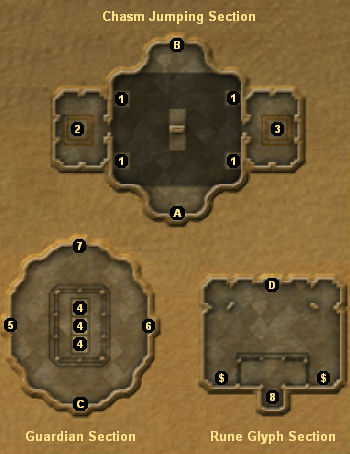
Chasm Jumping Section
Did we miss anything in this location? Is there something we didn't discover? Let us know!
Chasm Jumping Section
You'll find yourself before a deep chasm. Your goal here is to jump around using the
fixed platforms and the rotating discs. The Athena blockers (#1) will try to knock you into the chasm,
but they won't move, and so you can kill them easily but slowly with ranged attacks.
For a quicker way to deal with the blockers, you can walk around the edge of the chasm, stop
right next to the platforms where the blockers are standing, and attack them from there.
If your melee weapon has a long enough range, you should be able to hit them without them
attacking you back. Even better, if you're proficient with heavy weapons, you can use a
sword of stone
or a
giant stone sledge.
Both are "pro vs. stone" and both are dropped by Athena enemies.
Each blocker is worth about 400,000 experience.
If you end up in the chasm, you'll find yourself in the shadow realm, which looks remarkably like
a maze of purple islands. To get back to the Shadow Ruins hub, you'll need to take the eastern gate,
then the eastern gate, and then the northern gate.
To activate the shadow gate to the north (Exit B), you'll have to pick up the
shadow crystal
(#2) and place it in the altar of shadows (#3).
Guardian Section
You'll find yourself in a room with three Athena guardians (#4). The guardians will start out inactive, so
attacking them won't do anything. Your goal here is to go through the shadow gates to the west (#5),
east (#6), and north (#7), and pick up
shadow stones from the chests in the "purple island" mazes
beyond them.
Each time you pick up a
shadow stone, you can use it on an Athena guardian in the main room to
awaken it and activate another shadow gate. After you've awakened all three Athena guardians, the
shadow gate to the south (Exit C) will activate, and you'll be able to enter the next section.
Here are the routes to take beyond each of the three shadow gates:
Door #5: East, east, west, loot the chest on the western side, south, east, east
Door #6: East, east, east, loot the chest on the southern side, north, north, west
Door #7: East, north, west, east, loot the chest on the southeastern side, north, south, southwest,
south, south
Note: In MMXII, the
Shadow Stones from the islands are orange, purple and red to differentiate them from the regular blue stones. Don't pick up these non-blue stones from the bodies of the Athena guardians, or you'll be stuck with them for the rest of the game.
Rune Glyph Section
This section is pretty straightforward. The rune glyph (#8) is at the far end of the room. After
activating it, you can go through the shadow gate (Exit D) and return to the Shadow Ruins hub.
1 - Athena Blockers
2 - Shadow Crystal
3 - Altar of Shadows
4 - Athena Guardian
5 - West Shadow Gate
6 - East Shadow Gate
7 - North Shadow Gate
8 - Rune Glyph
Press the SHIFT key to activate (light up) the rune glyph.
Exits:
- Shadow gate back to the Shadow Ruins hub.
- Shadow gate to the Guardian Section. You'll have to place the shadow crystal (#2) in the
altar of shadows (#3) to activate the gate.
- Shadow gate to the Rune Glyph Section. You'll have to place shadow stones (available via
the doors at #5-7) in the three Athena guardians (#4) to activate the gate.
- Shadow gate back to the Shadow Ruins hub.


