 Did we miss anything in this location? Is there something we didn't discover? Let us know!
Area Note
Did we miss anything in this location? Is there something we didn't discover? Let us know!
Area Note
This section only includes people and locations required for the main quests in the game. If you're
looking for information on class or guild specific quests, then check the Guild Quests section.
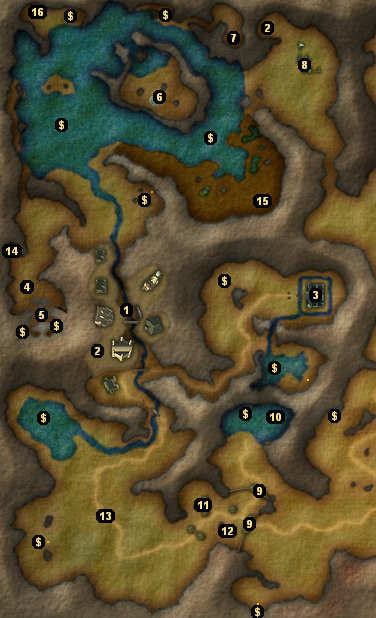
1 - Arindale
See the Arindale section for details.
2 - Moon Bridge
3 - Ulm
You won't be able to enter Ulm until you've been sent there on a quest (after the Trial of the Ancient
Elders). See the Ulm sections for details.
4 - Fire Drake Breeding Grounds
Fire drakes are tough to kill, but they're worth over 250,000 experience each. At the southern end
of the breeding grounds you'll find some nests where you can acquire the
egg needed for the
House of the Dragon quest in Fargrove. See the Breeding Grounds section for a more detailed look
at this area.
5 - Altar of the Diamond Light
The altar is involved in a quest from the Celestial Order.
6 - Island / Shrine
This island contains a Shrine of Celestial Power, which is involved in a quest from the Celestial
Order. It is also patrolled by moonbeasts, which drop
moonstones. You'll need a
moonstone in order to operate moon bridges (such as the ones at #2).
Moonbeasts won't
always drop
moonstones. You might have to kill several to
get one. Fortunately, there are a couple tricks to killing them. They usually won't climb up
onto the shrine, meaning you can stand on it yourself and pelt them with ranged attacks, and
they'll never go into the water, meaning you can let them chase you to the lake and then pelt
them from there as well.
Note: In MMXII you should be careful not to pick up more than one
moonstone. Extra
moonstones will just take up space in your inventory, and you won't be able to drop them.
7 - Altar of Stars
8 - Talendor
Talendor is the name of Galdryn's destroyed castle. In the ruins you should find a staircase
leading down into the Chamber of Spirits. After completing most of the quests in Arindale,
Emmindor will give you the
Ring of Talendor,
which will allow you entrance into the chamber.
You'll need to visit the Chamber of Secrets to drop off the Relics of Power. Each time you place
a relic in the chamber, you'll receive +3 to all of your attributes, and you'll gain some experience.
After placing the last relic, you'll begin the endgame sequence.
Note: In MMXII, the first time you visit Talendor you'll get attacked by a group of Barrowgrim soldiers and goblins led by Captain Durreck. Durreck will drop a
Silver Fang, a
Grim Helm and more when he dies.
9 - Gate (Collector's Edition)
The elf guards at the gate won't be very chummy when they notice you. Before they'll allow you to
pass, they'll require that you have an official writ from the Elven Council of Arindale, or that you
possess the "divine mark of Ordained Favor." Since the Elven Council is out of reach, your only
option is to become marked.
To obtain the mark, you'll have to visit the tower on the eastern side of Lake Lohr (#10). You'll
find the tower guarded by a shade. Shades are about the same as banshees. They won't freeze you,
but they're immune to ranged attacks, and they'll usually hover out of range of melee attacks, and
so the best way to deal with them is through magic.
At the top of the tower, you'll find an Altar of Peace. This altar is just like the one in the
Temple of the Circene in Fargrove -- it'll heal you when you click on it -- except that this one
will also summon an elven spirit guide. The spirit will give you the blessing that you'll need to
pass the gate.
10 - Island Tower (Collector's Edition)
You'll have to climb two ladders to reach the top of the tower. If you click on a ladder but nothing
happens, that probably means that you're on the wrong side of the ladder.
11 - Elder Uriel Dane (Collector's Edition)
You'll find Elder Uriel Dane in a hut connected to the elevated elven walkways. He'll tell you the
story of an evil wizard named Malokan, and how Malokan's spirit still stalks the land once a year.
At the end of his story, the elder will give you some
devil's dust so that you may call and
defeat Malokan's spirit, and he'll also ask you to find the talisman that is allowing Malokan's
spirit to remain in the mortal plane.
You'll find Malokan's spirit south of the Great Northern Lake (aka Lost Lake), at a stone shaped like
a devil's moon (#15). When you sprinkle the
devil's dust on the stone, Malokan the Fiend will
appear and -- shock of all shocks -- he'll attack you.
Malokan is a major pain to fight. He'll summon mushmen, he'll poison you, he'll stun you, he'll send
out locusts, and he'll throw big, wide logs at you. If you don't have any way to breathe air (via
potion or spell) then you'll have to run around a lot, dodging poison gas and mushmen while whittling
away at Malokan's health. You can also draw Malokan and his minions to the water. Malokan and the
mushmen won't enter the water, so if you have a decent ranged attack, you can just sit in the water
and ping away at them, only stopping to block whenever Malokan starts his log-throwing animation.
When Malokan dies, he'll drop a
dark pact bracelet, and you'll earn over 75,000 experience. If you then take the bracelet back
to Elder Dane, he'll reward you with an
elven ring of renewal and 5000 gold, and you'll also receive 10,000 experience and a point of
honor.
Note: Besides Elder Uriel Dane and Palomir (#12), you'll also find a few elevated huts with level 5-6
treasure chests in them.
12 - Palomir (Collector's Edition)
You'll find Palomir in one of the elevated huts in the fortress. Palomir is a shopkeeper with a good
variety of potions and elven gear.
Note: Besides Elder Uriel Dane (#11) and Palomir, you'll also find a few elevated huts with level 5-6
treasure chests in them.
13 - Erlinmir (Collector's Edition)
Somewhere in this area you'll run into Erlinmir. He paces around the forest, and sometimes he hangs
out on the road, but if you're patient (or have a
crystal of vision), you should eventually
find him. Erlinmir will ask you to find his flask, and he'll tell you that a bright orange and red
creature stole it from him.
The creature in question is a goblin named L'Cuda Flamebone. You'll find him, a bunch of goblin pyros
and a shack at #14. If you have a decent resistance to fire, then you'll be able to deflect most of
the damage the group will heap on you, but still, you'll find a bunch of goblins here, and so you'll
need to do some bobbing and weaving to defeat them all.
When Flamebone dies, he'll drop the key to his shack. Inside, you'll find
Erlinmir's flask,
plus a level 6 treasure chest. Then when you return the flask to Erlinmir, he'll reward you with
2500 gold, and you'll also receive 10,000 experience and 5 points of honor.
14 - Treasure Chest / Flamebone's Shack (Collector's Edition)
If you're playing the Collector's Edition, then you'll find a shack here (see #13 for details).
Otherwise, you'll only find a chest here.
15 - Devil's Moon (Collector's Edition)
The devil's moon stone is involved in the quest from Elder Uriel Dane (#11).
16 - Shack (Collector's Edition)
You'll find a shack with a chest in it here. This chest replaces the one that you'd otherwise find
just to the east.


