 Did we miss anything in this location? Is there something we didn't discover? Let us know!
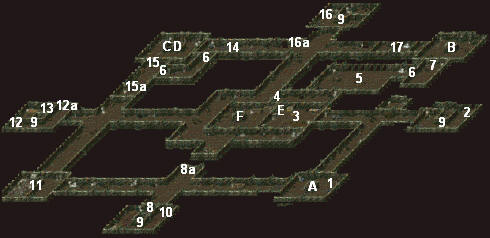
1 - Taxlehix
Did we miss anything in this location? Is there something we didn't discover? Let us know!
1 - Taxlehix
Taxlehix, your old friend the borrower / merchant / trainer, will mention his uncle Nixfix, and he'll tell you a riddle for how to find him: "Where you level up / Count back from 10 and stop at T / Turn to your heart and look for me / You can't see but follow your knee." That's impish for "Go north and then hang a left." After the conversation you'll find Nixfix and Taxlehix at #3.
2 - Critter
You'll have to fight a level 25 "critter" here. On the ground near the monster you should see a pair of
red gems. You'll need one of the gems for the Statue Room (#11).
3 - Nixfix and Taxlehix
Nixfix will talk about a lot of things (like a monster somewhere in the tunnels), but he won't be very helpful about anything. Later, after you've been to level 2 and learned that you'll need a
kohar root for the first summoning test, Nixfix will propose a trade: you bring him a
mushroom (located at #13) and he'll give you the root. To make the exchange, just talk to Nixfix again. The
kohar root should appear in your inventory. (Since you'll probably have picked up the
mushroom before receiving the quest, you might need to drop it and then pick it up again to get Nixfix to recognize that you have it.)
Later still, during the second summoning quest, you'll learn that you'll need a book about summoning strategies, and that an imp probably has it. When you talk to Nixfix and then Taxlehix, you'll discover that an imp named Hoxplox is the likely culprit, but that he's in the Lower Tunnels. Taxlehix will then give you a key so you can unlock the door to the west and access those tunnels (via Exit F).
Also in the room you should find a locked chest. The key for the chest can be found at (#7).
4 - Locked Door
The lever to open the door is just to the east.
5 - Shadows
When you enter the room, several shadows will complain about the noise you're making. If you have the
guitar from Academy Level 1, then you can play it to make the shadows even more miserable, and then they'll give you the unique amulet
heart of the spirits to make you stop. If you don't play the
guitar, then you'll have to kill the shadows. In that case you won't receive the amulet, but you will get the experience for killing the shadows. Since the amulet isn't very useful, killing the shadows is probably the best plan.
Also, in one of the "entrances" on the northern side of the room, you should find a magical object.
6 - Illusionary Wall
7 - Key
The
key is in a vase. It unlocks the chest in Nixfix's room (#3).
8 - Door and Lever
Pull the lever (#8a) to open the door.
9 - Levers
These four levers open the doors at #17.
10 - Hole
When you click on the hole, you'll see "two yellow gems blinking down there." If you then reach inside, you'll either pick up a (worthless)
bone or a
yellow gem. You'll need a
yellow gem for the Statue Room (#11), so keep reaching inside the hole until you get one.
11 - Statue Room
The first thing you should do in the room is read the note. You'll learn that you'll need some orange gems in order to get to the
gem in the locked part of the room. However, you'll only find
red gems (at #2) and
yellow gems (at #10) in the tunnels. So how do you get orange gems? That's right; you'll need to combine them. Place one
red gem and one
yellow gem in the imp statue, and then step away. The door to the white
gem next to the dragon statue will open up, allowing you to get it. You can use the
gem at #14.
12 - Door and Lever
You can use the lever (#12a) to open the door.
13 - Mushroom
You'll find a
mushroom on the ground here. You'll need it for a later quest.
14 - Raanaar Ghost
The ghost will ask for its
gem back. If you acquired the
gem from the Statue Room (#11), then if you give the
gem to the ghost, the ghost will tell you about the nearby illusionary wall. Otherwise, if you decide to keep the
gem, you'll have to kill the ghost.
15 - Door and Lever
You can use the lever (#15a) to open the door.
16 - Door and Lever
You can use the lever (#16a) to open the door.
17 - Locked Doors
You'll find four locked doors here. To pass them, pull the levers at #9.
Exits:
A. Stairs down to Academy Level 1.
B. Stairs down to Academy Level 1.
C. Stairs down to Academy Level 1.
D. Stairs down to the Lower Tunnels.
E. Rope up to Academy Level 2. This exit will only become available after you've been to Academy Level 2 and lowered the rope.
F. Stairs down to the Lower Tunnels. You won't get access to this staircase until you've started working on the second summoning test on Academy Level 2.


