 Did we miss anything in this location? Is there something we didn't discover? Let us know!
1 - Taxlehix
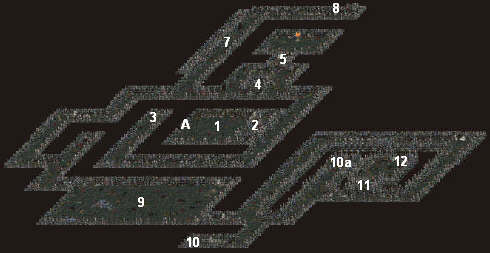
You'll find Taxlehix "borrowing" some trinkets from a dead guy when you enter the room. Taxlehix is a shopkeeper and a trainer for thieving skills, and, when you approach the exits to the east (#2), he'll ask you a riddle. If you answer "the middle one" you'll receive 8344 experience. Regardless of what you answer, Taxlehix will disappear after he asks the riddle, so be sure to do whatever shopping and training you need to do with him first.
2 - Exits
There are three exits from the room. As indicated by the riddle from Taxlehix (#1), the middle exit is the safe one. The other two exits are trapped.
3 - Stone Gargoyles
At the end of the corridor, a pair of stone gargoyles will jump out to greet you. The gargoyles are both level 9, so unless you've been to the battlefields, you'll probably have to come back for them later. When the gargoyles die, they'll drop level 1-2 magical equipment.
4 - Two Levers
Both levers seem to do the same thing -- open or close the door to the north (#5).
5 - Two Doors and a Lever
You can open the northern door by pulling the lever. To open the southern door, pull one of the levers to the south (#4).
6 - Statue Room
When you approach the statue, it will summon four skeletons, including two skeleton mages, to attack you. The best way to deal with the mages is to use a ranged attack. Trying to chase them down is annoying. Once the skeletons are dead, click on the statue to receive a disappointing
golden amulet. The amulet isn't involved in any quests.
7 - Trapped Passage
If you try to run through the passage, you'll probably get killed by the traps, which is never good. To avoid the traps, heed the nearby clues. At the southern end of the passage there are two signs that read, "Two burning lights but you still don't see." That's a hint for the narrow passage that runs along the western side of the trapped passage (there are two torches next to the entrance). At the northern end of the narrow passage is another sign. It reads, "Bring on darkness and you will see." So if you click on the torch in the narrow passage (extinguishing it), a section of the wall will disappear, allowing you to bypass the trapped passage.
8 - Illusionary Door
If you click on the door, a skeleton mage will appear, taunt you, and then attack you. A chest will also appear where the door was. The mage and the chest should provide low level magical objects.
9 - Trapped Room
You'll encounter several traps in the room, so save and rest as necessary. Most of the traps are on the southern side. The lever in the northeastern corner opens the door in the southeastern corner.
10 - Statue
Clicking on the statue will teleport you to #10a.
11 - Doors and Levers
Here you'll find two doors, and, next to each door, a pair of levers. Pull the left lever at the southern door and the right lever at the northern door to get through.
12 - Water Crystal
When you approach the corner of the room where the
small water crystal is, you'll be teleported to a woman who will tell you that her child swallowed a fishbone and needs your help. It's a trap. When you enter the house, the people inside will turn into skeletons and attack. As soon as the last skeleton dies, you'll be teleported to prison level 4, so try to loot everything in the house first.
You'll be able to come back later for the water crystal.
Exits:
A. Stairs back up to prison level 2.