 Did we miss anything in this location? Is there something we didn't discover? Let us know!
Area Note
Did we miss anything in this location? Is there something we didn't discover? Let us know!
Area Note
You'll have to make some choices in this level, but they won't have any relevance to the game. So decide however you want.
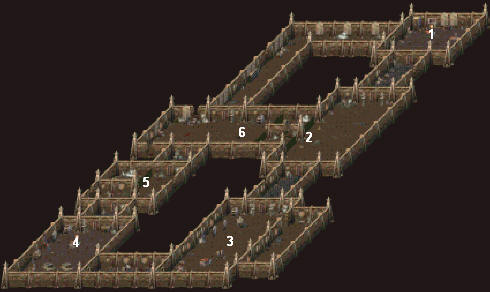
1 - Starting and Ending Point
This is where you'll start in the hall. When you talk to the ghost to begin the test, he'll open the door to the south. Then, after you've made your choices in the level and worked your way back to the ghost, talking to him will take you back to Academy Level 3 (and also earn you 78,144 experience).
2 - Prisoners and Candles
When you approach cages holding the prisoners, you'll learn that you can free one prisoner by blowing out the candle in front of the other prisoner's cage. However, the prisoners are really trying to save each other and their statements are false. That is, you'll actually free the prisoner next to the candle you blow out, and the other prisoner will be killed.
Regardless of the choice you make, neither prisoner will be happy with you. Luckily, you don't have to make a decision right away, and if you travel all the way around to the opposite side of the cages, you'll find a lever (#6). Pulling the lever will open both cages and free both prisoners.
3 - Monsters
You'll find two monsters here. They'll fight each other until you move far enough into the room, and then they'll attack you. (If you want, you can wait for one monster to kill the other, but it's quicker to just wade in and kill them both.)
4 - Kings
You'll meet two kings here. One of their kingdoms will survive and the other will fail. It's fairly arbitrary which one you help. For the most experience, give the sword to one king and then kill the guard that appears.
5 - Guard and Prisoner
When you approach the prisoner's cell, the guard will tell you not to free the prisoner. The prisoner will claim she was imprisoned unjustly. If you want to free the prisoner (or gain the most experience), then press the white button on the northern wall. The guard will die and the prisoner will turn into a chaos creature and attack you. If you want to leave the prisoner where she is, then just leave the room to the north.
6 - Lever
Pulling the lever will open both cages at #2.


