 Did we miss anything in this location? Is there something we didn't discover? Let us know!
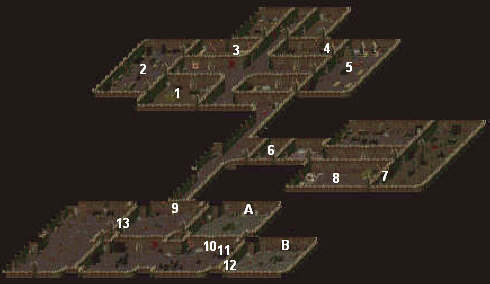
1 - Haystack
Did we miss anything in this location? Is there something we didn't discover? Let us know!
1 - Haystack
This is where you'll start on the level. "Clumsy human, you hit your head. How could you miss a haystack that big?"
2 - Horex
Horex will tell you that his brother Odox was attacked by "nasty little teeth" (a spider), and that only a tooth from the creature can cure him. You'll find the spider at #8. When you bring its tooth to Horex, you'll receive 5184 experience, and Horex will unlock the hatch in the room. Inside the hatch you'll find 100 gold and a
summoning doll.
Once Odox is cured, he'll act as a skill trainer.
3 - Locked Chest
The
sapphire key that unlocks the chest is on the nearby bed. Inside the chest you'll find a
bedroll, which will allow you to rest anywhere.
4 - Skillbook
You'll find a skillbook on a table here. It improves four areas of wizard body magic.
5 - Statue Room
When you enter the room, the deathknight will "contemplate" why the Ranaar didn't remove the statue of the Damned One. To find out, move the nearby pile of packages out of the way. That will reveal a lever. When you pull the lever, the statue will slide over to reveal a hole. Down the hole you'll find an altar with a
holy tome on it. The character who picks up the tome will permanently gain 60 hit points. It's best to let your character (and not the deathknight) do this.
Also in the room, by the door, you'll find a book that teaches you the first part of the Ranaar alphabet. You'll find the other two parts in later acts.
6 - Levers and Doors
There are two levers and two doors. One door is always open while the other door is always closed and locked, and the levers flip which door is which. To move your characters through the area, you'll have to split them up. Send one character into the middle region, and then have the other pull a lever. That will allow the first character to arrive at the opposite lever. Then the first character can pull the opposite lever twice, once to allow the second character into the middle region, and then once to allow the second character to rejoin the first character. Unfortunately there isn't any way to open both doors, so you'll have to repeat this process every time you want to move through.
7 - Locked Door
To unlock the door, click on the nearby lit torch.
8 - Boney Monster
This is the spider Horex (#2) might have asked you to kill. It's level 8, so it can be tough to kill if you haven't visited the battlefield for this act yet. The spider will drop a
poisonous tooth when it dies.
9 - Locked Door
The nearby levers unlock the door.
10 - Locked Door
The lever next to the door unlocks it.
11 - Table
The table contains a
composite key. The key unlocks the door at #13.
12 - Locked Door
You won't be able to unlock this door until you reach the end of the prison levels.
13 - Locked Door
The key in the table (#11) unlocks the door.
Exits:
A. Stairs to prison level 3.
B. Stairs to prison level 1.


