 Did we miss anything on this map? Is there something we didn't discover? Let us know!
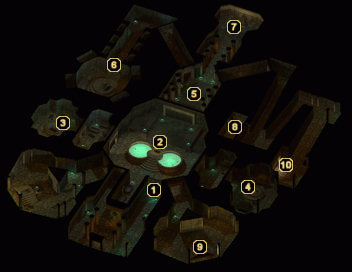
1 - Locked Door
Did we miss anything on this map? Is there something we didn't discover? Let us know!
1 - Locked Door
This initial door will be locked. You'll need the Gate Key and Sanctum Key from the crypts out in the
Vale of Shadows to make it past this door and explore the entire Black Wolf Temple, so backtrack if you didn't grab them both.
2 - Undead Battle
There are quite a few Skeletons and SKeleton Archers within this room, so be prepared for a battle. Once you've taken them out, there will be four separate doorways you can enter. To the southeast and southwest are some simple rooms filled with Skeletons and various treasure. The first real problem you'll face is in the western room at area #3. You'll need to travel there first in order to be able to open the door to area #4.
3 - Priest's Key
You'll need at least one magical weapon for this chamber (check the crypts out in the
Vale of Shadows if you don't have any). Within the room are some Zombies, Skeletons, and a Wight - a powerful undead creature immune to normal weapons. With at least a +1 weapon, you can destroy the creature for 1400 experience points. When all the undead are slain, search the sarcophagus for the Priest's Key, three potions, and a set of
Gauntlets of Weapon Skill.
4 - Holy Symbol of Myrkul
You'll be faced with yet another battle with various undead here. Once finished, search the two nearby containers to find some more loot, including a
Short Bow +1 and the Holy Symbol of Myrkul. You'll need this to open the door to area #5.
5 - Bone Dancer Mytos
As soon as you enter this chamber, you'll encounter a Bone Dancer by the name of Mytos. He will question why you've intruded upon the vale and this temple without any good reason for doing so. He'll also deny that he has anything to do with Kuldahar's troubles.
There are two ways to gain experience points from this conversation. If you try to pursue a non-violent course of action during the dialogue, you'll earn 3225 experience points. In addition to that experience bonus, you can also enter a debate about the ethics of raising the dead for another 3225 experience if the character you're speaking with is a Paladin. Regardless of the final outcome, you'll eventually have to enter battle with Mytos and his four Skeletal Guardians. Take him out first, as he is a fairly adept spellcaster. When they're all lying in a heap on the stone floor, loot Mytos' corpse to find a
War Hammer +1.
6 - Undead Ambush
Prepare yourself before entering this chamber. When you reach the end of the hallway, a series of secret doors in the northern hallway will open, revealing a small army of Skeletons. Two Skeleton Archers will pummel you from the sarcophagus as you fight off the other undead, as well. After destroying all the hostiles, search the sarcophagus to find some gold, two scrolls, and a
Short Bow +1.
7 - Sending of Myrkul
As you proceed down the hallway into this room, you'll be attacked by a monstrous shadow called the "Sending of Myrkul" and four skeletons. The shadow is worth 600 experience points alone and will drop a
Ring of Shadows when it dies.
8 - Mausoleum Key
Behind this secret door is a Mummy, which will prove to be a fairly difficult opponent for most parties. It's worth your trouble, though, as you'll gain 3000 experience points when the Mummy dies. Search the two nearby containers afterwards to find some gold, scrolls, a
Mage Robe of Cold Resistance, the Mausoleum Key, and a random magic item (such as a
Diseased Halberd +1).
9 - Loot!
Wipe out the few undead guarding this chamber to snag the potions, gems, gold, and
Long Sword +1 resting within the two containers.
10 - Exit
Here lies a guarded doorway down to
Black Wolf Temple 2.


