 Did we miss anything on this map? Is there something we didn't discover? Let us know!
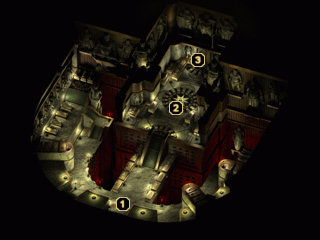
1 - Arrival
Did we miss anything on this map? Is there something we didn't discover? Let us know!
1 - Arrival
As soon as you step foot in the Tiers of the Dead, your party will be ambushed by a variety of undead - Ghasts, Ghouls, Wights, Zombies, and Skeletons. When you've dealt with all of the undead, you'll discover that there are seventeen different tombs to search through near the entrance, many of which contain magic items and other treasure. A majority of these tombs are trapped, though, so be very careful as you plunder them all.
Rather than list what's in each tomb individually, I'll give you a quick overview of the magic items you can expect to have when you've emptied them all - a
Dagger +1, a
War Hammer +1, a
Two Handed Sword +1, a
Large Shield +1, +4 vs. Missiles, a
Small Shield +1, three random items (such as a
Reinforced Large Shield +2 or a
Mage Dagger +3), and four random missiles (such as
Inferno Arrows +2 or
Static Darts +3). Keep in mind that this only includes the tombs on the southern half of the map.
2 - Terikan
You'll encounter Terikan and several of his undead friends at the top of the stairs. Focus your attention on Terikan as he has a lot of powerful spells at his disposal. When the lich finally falls, you'll receive 10,000 experience points and the remaining undead will crumble to the floor. However, since Terikan's phylactery is still in pristine condition, the lich can reanimate at any time and you'll be forced to slay him again... and again... and again (for no experience, so it's pointless to stall). Quickly loot the eight remaining tombs to find Terikan's Key, a
Short Sword +1, a
Heavy Crossbow of Accuracy, a random item (such as a
Ring of the Protector +2 or
Scarab of Defense), and a random missile (such as some
Arrows of Piercing or
Static Darts +3), then proceed toward the exit.
3 - Exit
Once you've located Terikan's Key in one of the nearby tombs, you can pass through this door into the
Hall of Heroes.


