 Did we miss anything on this map? Is there something we didn't discover? Let us know!
1 - Albion
Did we miss anything on this map? Is there something we didn't discover? Let us know!
1 - Albion
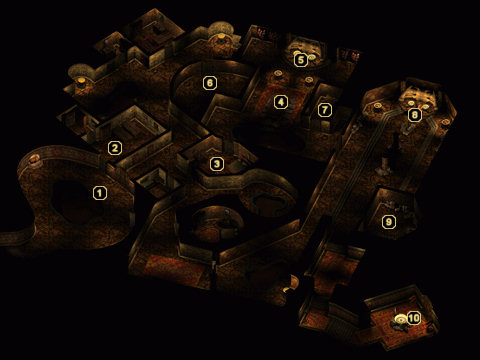
A few paces in front of the doorway stands Albion, a friendly priest - or so it may seem. The reality is that this entire level is filled with snake-worshipping cultists posing as helpful allies. Of course, this means that you'll be doing a lot of fighting sooner or later, but it actually works to your advantage to set this in motion later rather than sooner. If you play along, you'll be able to purchase spell scrolls from Geelo at area #2 and make use of various temple services from Sharra at area #3.
When you're ready to deal with the snake lovers, you have a few options. If you have a Paladin in your party, the character will see through their evil immediately and the entire level will become hostile (before getting any use out of the merchant and priest). A character with a high Intelligence can also expose the lot through dialogue, and a couple of other solutions to trigger the event can also be found as you explore the level. Regardless of which method you use, your party will earn 24,000 experience points and you'll find yourself up against a massive number of casters, Eldathyn warriors, Lizard Men, and Yuan-ti.
When Albion falls, loot his key as you'll need it later.
2 - Geelo the Librarian
Geelo will sell you some spells if you haven't exposed any of the priests yet. When he becomes hostile, slay him to find two
Potions of Invisibility and some
Bracers of Defense AC 6.
3 - Sharra the Healer
Sharra will offer healing and an opportunity to rest if you haven't exposed any of the priests yet. When she eventually dies, you won't find anything of value on her corpse.
4 - The High Ritualist
The High Ritualist and several other Yuan-ti are huddled around this table enjoying a meal of... Kuldahar villagers. With a call to the god Sseth, the whole lot of them will attack your party. Give them a demonstration of your battle prowess, then proceed to the statue at area #5.
5 - Yxunomei Statue #1
Click on this statue of Yxunomei to find three
Oils of the Serpent's Scales, a
Potion of Hill Giant Strength, and some gold.
6 - Captive Adventurers
As soon as you open the door to this room, a man named Marchon of Waterdeep will accuse your party of being "damned snake fiends." After pleading your case to him, he realizes that you aren't part of the cultist army and charges off with his friends to kill any that they come across. Having this group at your back can make this level considerably easier, so you might want to pay a visit here to free them early on.
7 - Altar
Search this altar to find a couple of potions, a random set of missiles (such as some
Berserker Darts), and two random magic items (such as a
Life Dagger +2 or
The Mace of Weal and Woe).
8 - Yxunomei Statue #2
This second statue of Yxunomei can be plundered for some gold, two potions, and a
Blur Deck.
9 - The High Summoner
The High Summoner and his Yuan-ti guards intend to make you suffer for your "vile, corrupting intrusion into their domain." Since this is most likely the final battle of this floor, feel free to unleash whatever spells you have at your disposal. Unfortunately, there's no loot to be had once you're victorious.
If you've freed the adventurers at area #6, you can now speak to Marchon and have his group watch over your party while you rest.
10 - Exit
This door will bring your party to
Dragon's Eye 5.


