 Did we miss anything on this map? Is there something we didn't discover? Let us know!
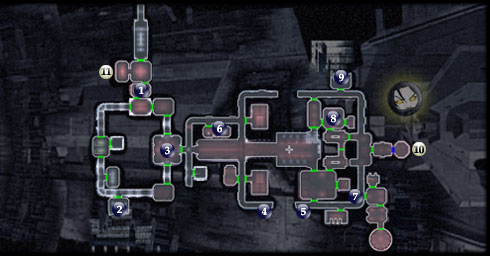
Shortly after you board at #1, Mandalore takes control over another party member. If Visas is in your party, he'll take over for the other party member you previously chose. Your goal here is, with the help of the Mandalorians, to place four proton cores in key structural weak points somewhere on the ship (at #2, 4, 5 and 9) to be detonated later, and then escape to the Bridge at #10 to contend with Darth Nihilus.
Did we miss anything on this map? Is there something we didn't discover? Let us know!
Shortly after you board at #1, Mandalore takes control over another party member. If Visas is in your party, he'll take over for the other party member you previously chose. Your goal here is, with the help of the Mandalorians, to place four proton cores in key structural weak points somewhere on the ship (at #2, 4, 5 and 9) to be detonated later, and then escape to the Bridge at #10 to contend with Darth Nihilus.
It sounds easy but you'll be battling through lots of Sith forces, along with having an accident along the way. After you place the third charge, the remaining proton core detonates, leaving you to find another one. Fortunately, you can find another at #6. After this, proceed to the last weak point (in the walkthrough, #9), place the core, and head to the Bridge. Simply beware of heavy Sith Resistance along the way, and check all rooms for items and more Sith for experience.
1 - Arrival
As mentioned above, shortly after you land, Mandalore will take over for one of your party members. The eventual exit that you need to backtrack to once you defeat Nihilus is above at #11. For now, take the western corridor south to #2, checking all rooms and defeating the Sith along the way.
2 - Place Proton Core
In this room, place the first of your four proton cores.
3 - Heavy Resistance
In this room is a particularly large number of concentrated Sith. The solution is easy: mass-affecting Force Powers. Afterward, instead of heading up towards #6, continue straight then take the south route to #4, as you'll be coming back to #6 eventually anyway.
4 - Place Proton Core
At the dead end of this corridor, place another of your four proton cores. The room just before #5 holds another large number of Sith.
5 - Place Proton Core
At the dead end of this corridor, place another of your four proton cores. If this is the third proton core, a cut scene will take place where the fourth will prematurely detonate. It's now up to you to find another. Head now to #6 to find the replacement proton core.
6 - Missile Bay Control Console & Workbench
Use this workbench for a last time before Nihilus, and check the console. Retrieve its proton core to continue with your mission. Instead of heading directly to #9 by way of #8, if you have Visas in your party, instead head south to #7 first for a nice bonus.
7 - Visas Meditates
As you approach the door, Visas will split from the party for a short time to meditate. At the end, she will gain a bonus to her maximum force points. Search the nearby rooms for items afterward.
8 - Colonel Tobin
This is where you meet with him one last time. Light Siders can spare his life by using the preservation of Onderon as persuasion, and may even give him the chance to set off the proton cores when ready, though no cut scene depicting that will play out. The other option is of course to kill him. A little more difficult than a regular trooper, he won't last long against your party.
9 - Place Proton Core
After you've retrieved the replacement proton core at #6 (if this is your fourth), place it here and then continue to the exit at #10.
10 - Exit
Exit to
Ravager Bridge (#1).
11 - Exit
You will only be able to access this after you defeat Nihilus on Bridge. After you backtrack to this point and escape from the Ravager's destruction, you'll end up on Telos facing a familiar face from the first game. He'll tell you about Malachor V, and it's there, its
Surface (#1) where you will land the Ebon Hawk, alone, a step closer to your final confrontation.


