 Did we miss anything on this map? Is there something we didn't discover? Let us know!
Description
Did we miss anything on this map? Is there something we didn't discover? Let us know!
Description
With their final prize just out of reach, the Order of the Flame must now retrieve a Seal of Light
stolen by the Umbragen, and fight their way past a massive compound that blocks the mountain pass
to the Heart of Siberys.
Walkthrough
This is the most straightforward chapter in the Order of the Flame campaign. The surface part of the
map basically only contains your nexus (#1) and the Umbragen nexus (#4), and there are only a couple
of sub-quests to do in the underworld. Most of the flavor in the chapter comes from random boss
monsters, including a frost beast (#2) and a pair of medusas (#17).
To start out in the chapter, you should do the usual: build up your nexus, harvest some dragonshards,
and explore the underworld to gain gold and experience. The Umbragen will cheat again, and so they'll
train way more units than they should (including a champion and a juggernaut), and they'll constantly
send out war parties to attack your nexus. So you should try to keep your main army near your nexus,
and then only explore the underworld in between attacks.
Eventually, once you've built up your army, you'll need to make a choice: to destroy the Umbragen nexus
or to skip it. The Umbragen nexus isn't involved in any quests or reward bonuses, and so attacking it
is optional, but the Umbragen will be a constant thorn in your side until it has been destroyed, and so
you might want to destroy it just to make the rest of the chapter easier.
If you decide to attack the nexus, the standard strategies work. Just send your army to the nexus, get
the attention of its defenders, and then draw them back to your nexus so you'll have the assistance of
your walls and towers. If you can do this a couple times without taking too much in the way of losses,
then you should get a free shot at the nexus.
The required portion of the chapter revolves around the "compound" at the northern edge of the map
(#3). You'll need to go through the gate in the compound to reach the Heart of Siberys, but you'll
find that the gate has a forcefield blocking it. To disable to the forcefield, you'll have to attack
the champion Orobus (#11), which will cause him to flee and activate the teleporter circle at Exit E,
and then you'll have to use the teleporter circle to reach the Umbragen compound generator (#19).
Destroying the generator will disable the forcefield. You'll also need to track down Orobus (#18) so
that you can kill him and regain the third
seal of light.
With the forcefield gone from the compound, you'll need to attack and destroy the Umbragen compound
cannon on top of it. The
wands of negation (#12) might be able to help here (it's difficult to tell if the wands
actually do anything in the chapter; they might be broken), but we've never needed any extra
assistance. By the time you've jumped through the hoops necessary to disable the forcefield,
taking out the cannon should be no challenge at all. Once you're destroyed the cannon, the
chapter will end.
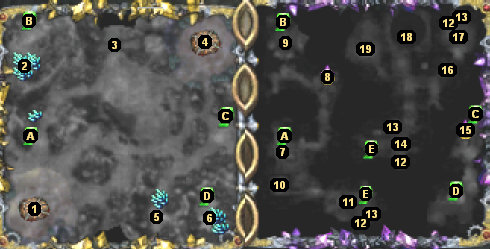
1 - Nexus
2 - Frost Beast
The frost beast will drop an
amulet of energy when it dies.
3 - Umbragen Compound
4 - Umbragen Nexus
5 - Ettins and Frost Giant
Here you'll find three ettins fighting a frost giant. All four are enemies (that is, you can't
"rescue" the frost giant or anything), so whack away when you see them.
6 - Lizardfolk Units
You'll find a handful of Lizardfolk units here. They won't drop anything interesting when they
die.
7 - Efreeti
The efreeti will tell you about a devil to the north (#9) who carries a
cursed scimitar, and he'll ask you to return the scimitar to him. If you do, then he'll
reward you with a champion's artifact: the
devil fang necklace.
Note: Just in case you're curious, "efreeti" is singular and "efreet" is plural.
8 - Mausoleum
When you first reach the mausoleum, you'll find it guarded by a grave keeper. The grave keeper will
drop a
horn of devil calling (which you can use at #9 and #10) when it dies.
The mausoleum itself is a place of power. It will create a skeleton fighter for you to control
(temporarily) each time one of your non-soldier units dies.
9 - Horned Devil
The horned devil is big and nasty, and that's probably why there are two sub-quests associated with it (see #7 and #10). If you have the
horn of devil calling (from #8), then you can use it to briefly paralyze the devil. Otherwise, it's just a matter of surviving long enough to kill the devil, and for that it's a good idea to have your units to at least level 2 and probably level 3. When the devil dies, it will drop a
cursed scimitar and a
sword of vampirism.
10 - Potion Laboratory
When you first approach the laboratory, you'll find it guarded by three iron golems. However, once
you've dispatched the golems, a deathless artificer (also called a mechanist) will appear and chastise
you for killing his bodyguards. The artificer will then mention the devil to the north (#9), tell you
that the
horn of devil calling (from #8) might help you to defeat it, and finally offer to convert
the horn into something more useful to you once you've dealt with the devil.
The devil can be difficult to beat, but once you've done so, the artificer will reward you with 10
horns of battle fury.
The potion laboratory itself is identical to the one from Chapter Two. That is, in a few places in
the underworld, you'll find
unidentified liquids, and when you use them on the laboratory, they'll be transformed into
more useful potions, such as
potions of haste or
potions of rage. Most of the liquids can be found at #13, but one should also be sitting
on the ground right next to the laboratory.
11 - Orobus, First Encounter
You'll find the champion Orobus plus a few of his favorite Umbragen friends here. Once you've done
enough damage to him, Orobus will flee through the nearby teleporter circle (Exit E). You'll have
to follow him to #18 to kill him.
12 - Wand of Negation
13 - Unidentified Liquid
14 - Marilith
You'll find the marilith here fighting a few Umbragen units. Mariliths resist spell damage at 95%, so
you'll have a tough time with it if you're using clerics and paladins.
15 - Wretched Chamber
The wretched chamber is a place of power. If you control it, then your units will attack faster.
16 - Traps
17 - Medusas
You'll find two medusas and a few dire giant cobras here. The medusas will drop random loot
when they die.
18 - Orobus, Second Encounter
This time you'll find Orobus with an umbrascarred beholder. That sounds like it could be nasty, but
if you attack the pair with a dozen or more fully upgraded units, then the battle shouldn't last very
long. When Orobus dies, he'll drop the third
seal of light.
19 - Umbragen Compound Generator
Destroying the generator will disable the forcefield surrounding the Umbragen compound (#3).
Exits:
A. Tunnel.
B. Tunnel.
C. Tunnel.
D. Tunnel.
E. Teleporter circles. You'll need to damage Orobus (#11) enough to cause him to flee before you'll
be able to use these teleporter circles.
| Mission Points | Value | Description
| Claim the Final Seal of Light | 2000
| Killed the champion Orobus and picked up the final Seal of Light.
| | Return the Cursed Scimitar | 500
| Returned the cursed scimitar to the efreeti.
| | Slay the Horned Devil | 1000
| Killed the horned devil.
| | Destroy the Umbragen Generator | 500
| Destroyed the Umbragen generator.
| | Destroy the Umbragen Compound | 1000
| Destroyed the Umbragen gate blocking the way to the Heart of Siberys.
| | Return the Horn of Devil Calling | 500
| Returned the horn of devil calling to the deathless artificer.
| |
| Bonus Points | Value | Description
| Great Commander Bonus | 500
| Allowed fewer than 25% of your units to die.
| | Against All Odds Bonus | 500
| Created less than nine captains.
| | Miser Bonus | 1000
| Used less than 2000 gold and 2000 shards.
| | Meticulous Bonus | 2000
| Completed every possible quest.
| | Time Bonus | 0
| Beat the mission in under 10 minutes. (You can actually score up to 1500
points here, but this bonus will never count against you.)
| | Difficulty | Varies
| Easy is worth 0 points, Normal is worth 500 points, and
Hard is worth 2000 points.
| |


