 Did we miss anything in this section? Is there something we didn't discover?
Let us know!
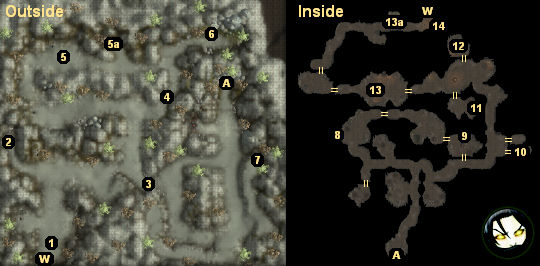
Walkthrough
1 - Starting Point
2 - Troll
Did we miss anything in this section? Is there something we didn't discover?
Let us know!
Walkthrough
1 - Starting Point
2 - Troll
In order to kill the troll, you'll need to damage it to remove its hit points, and then you'll need to do fire or acid damage to kill it. If you don't have any spells or weapons that can do fire or acid damage, then you might want to visit Simmy at
Old Owl Well.
Also, you'll find a partially devoured orc with the troll here, but there isn't anything you can do with it. The corpse is just there to show you that the orcs and trolls don't get along. You'll encounter more trolls as you advance through this area, and elsewhere in the game.
3 - Rockslide
You won't be able to do anything about the rockslide when you first come to it. However, later, inside the troll cave (#6), you'll find a
box of unstable blastglobes. When you bring the box to the rockslide, you'll automatically trigger a cutscene where you'll blow up the rocks and clear a path. If you have Qara in your party, then she's the one who will trigger the explosion.
4 - Second Rockslide
To pass through this rockslide, you'll need Elanee in your party. Then when you approach the rockslide from the north, Elanee will discover "some tracks which reveal an opening in the obstacle," and the rockslide will disappear.
Note: We've heard that if your character is a druid or a ranger (or perhaps just has enough ranks in the survival skill), then you can discover the path through the rockslide as well.
5 - Orcs / Troll
When you approach the orcs (#5), you'll overhear them talking about an orc scout named Hrulgat, and how Hrulgat might have run into a troll. If you intimidate the orcs by yelling at them, then they'll rush around the corner and get killed by two trolls there (#5a), and then you'll have to battle the trolls. If you do nothing, then Hrulgat will come running back to the orcs with a troll on his tail, and you'll have to fight the troll. If you simply attack the orcs, then you'll have to kill the orcs in one battle and a single troll in a second battle. It doesn't really matter which option you take.
6 - Troll Cave
As its name implies, you'll encounter a few trolls inside the cave. You'll also find some orc bodies to loot. One of the trolls will drop a
Swordsman's Belt when it dies.
At the back of the cave, you'll discover two things of interest: a crate and a vein of ore (for more information on ore, see #8). Inside the crate you'll find six (or 12)
Blastglobes and a
box of unstable blastglobes. Depending on the companions you have with you, you might start up a conversation when you approach or click on the crate, and then you might need to click on the crate a second time to actually see its contents. The
Blastglobes are basically grenades that cast "delayed blast fireball," and so they're very useful if you're not playing a spellcaster character. The
box of unstable blastglobes can be used at the rockslide (#3) to clear a path.
7 - Guyven of the Road
Guyven will tell you that he's an explorer, and that he plans to visit the old Clan Ironfist stronghold, which is located nearby (you can find it at the site marked
Dwarven Scouts, which should have appeared on the world map after you visited
Old Owl Well). Guyven will tell you something of the history of the stronghold, and you'll receive 250 xp for talking to him.
This is one of the three places where you can meet Guyven. See the
Guyven of the Road section for more information.
8 - Ore
The vein of ore won't make much sense now, but it will become useful later. You'll receive 50 xp for clicking on it.
9 - Weapon Rack
Inside this weapon rack you'll find a
Fey Spear +1.
10 - Pentin
Pentin is a miner, and he'll tell you that he and his men were captured by the orcs when they were trying to mine the ore in the lair (#8). As far as we can tell, there isn't a key for his cell door, so you'll have to use other means to let him out. Once you've opened the door, Pentin and his men will automatically leave for
Old Owl Well. Eventually you'll be able to recruit Pentin to work for you, but that won't happen until Act II.
"By the gods, if this is the first locked door you've encountered in your life, then we're really doomed."
11 - Chest
Inside this chest you'll find the recipe book
Fundamentals of Terrible Destruction, plus more.
12 - Orc Matron
The orc matron will drop an
Orc Rolling Pin when she dies.
13 - Yaisog Bonegnasher
When you reach Yaisog the first time (#13), you'll be allowed to talk to him briefly, but then he'll order his guards to attack you, and he'll retreat farther into the cave. When you meet him the second time (#13a), he'll attack you, but after you've damaged him enough, he'll beg you to spare his life. If you let Yaisog live, then he'll pretend to tell you things, but he'll mostly be lying. Worse, he'll run straight to Logram Eyegouger, and he'll assist the orc chieftain when you finally have your showdown with him. When you kill Yaisog (either now or later), he'll drop a
Stonefire Axe +1 and some other things.
14 - Fake Emissary
The man here will claim to be Emissary Issani, but he's not. You can discover this fact during your conversation with him (Neeshka in particular will tell you that she doesn't trust him), and if that happens then you'll have to fight him here. If you don't discover who he isn't, then he'll either follow you or leave for
Old Owl Well on his own, but in either case you'll have an encounter on the way there, and he'll attack you with some orcs. When the fake emissary dies, he'll drop
Bracers of Armor +3, a
Kukri +2,
The Book of Seeing, and more.
Note: If the fake emissary joins your party, then you can take him to the
Eyegouger Clan if you want, and he'll help you in your battles against the orcs. However, if he's in your party when you reach the real emissary, then he'll attack you.
Exits:
- Entrance to the Bonegnasher Lair. You'll meet two orcs outside the lair. You'll be given dialogue options to convince them to let you see their chieftain (#13) without violence, but as of version 1.04, it won't make any difference. No matter what you say to the orcs outside the lair, the orcs inside will attack you.
- World exit.


