 Did we miss anything in this section? Is there something we didn't discover?
Let us know!
Area Note
Did we miss anything in this section? Is there something we didn't discover?
Let us know!
Area Note
After defeating the King of Shadows at
Crossroad Keep, you'll automatically be sent to the keep interior. When you talk to Aldanon there, he'll create a portal to the Vale of Merdelain, and you and all of your companions will go through it.
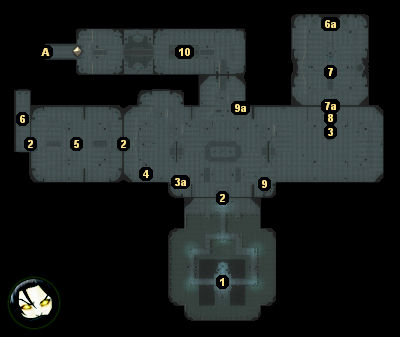
When you arrive at the Vale of Merdelain (#1), Neeshka will disappear (captured by the King of Shadows), and you'll be prompted to fill out your party. You'll have to take Ammon Jerro and Zhjaeve with you.
Walkthrough
The first thing to know about this area is that you'll probably be attacked if you try to rest. Enemies won't attack you right away, meaning that you'll heal a little and perhaps memorize some low level spells first, but the battle that resting will cause will probably do more damage to you than the benefit that resting will give, and so you should avoid resting as much as possible. If you have equipment with regeneration bonuses, or if you've stashed away some healer's kits, now is the time to use them.
Note: If you didn't bring any healer's kits with you, you'll find plenty on the numerous corpses in the area.
Another note: While resting can be difficult, nothing will stop you from using the "restorative mediation" power on the
Silver Sword of Gith. So you can use the sword's offensive powers as much as you'd like.
The second thing to know about the vale is that patches of black fog (#3, #6, #9) will act as teleporters. They're one-way teleporters, and once you've used one, you won't be able to get back to where you were, so be sure to loot everything you want before going through them. The good news is that the patches of fog will never lead you astray -- each time you take one, you'll move closer to the final battle -- and so although the area map can be confusing, you should never get lost.
So just try to make your way through the vale as well as possible. You'll face bone spiders in the first section (#1), and after that you'll have to deal with a whole host of undead creatures, including liches (#8) and mummy lords (#9a). Eventually, you'll arrive at the final battle and have to face no less than three shadow reavers (#10).
The shadow reaver battle is one of the toughest in the game. You'll start out on a bridge, and one of the shadow reavers will teleport behind you, blocking your escape. That will make maneuvering difficult, because you won't be able to get off the bridge, and so you won't be able to get Ammon Jerro or Zhjaeve to a safe location for their recitations.
The key to the battle is the very start. The shadow reavers will begin by casting some area effect spells on you, which will prevent Ammon Jerro and Zhjaeve from performing their recitations. That means you'll be stuck on the bridge, you'll be taking damage, but you won't be able to do damage in return, because the shadow reavers will be regenerating their health every time they get to 50% damage.
If you can survive this first stage of the battle well enough (by concentrating on healing your party, and perhaps by summoning some creatures to distract the shadow reavers), then you should be in good shape. From our experience, the shadow reavers will eventually stop casting area spells, which will allow Ammon Jerro and Zhjaeve to recite their true names, and once that happens, the reavers should go down relatively quickly.
Note: In all the times we've played through this sequence, Zhjaeve has never been able to complete a recitation. So you might want to control Ammon Jerro in the battle, just to micromanage his recitations and ensure that at least one of your companions is doing what he's supposed to.
Another note: A good trick for the battle is to tell Ammon Jerro to stand his ground on the platform before the bridge. That way he won't get stuck on the bridge when the battle starts up. Then, as long as he doesn't engage any of the shadow reavers with his spells or melee attacks, they'll ignore him, allowing him to recite their true names in peace.
Once you've completed the battle, you'll have earned 3000 xp total (1000 xp for each of the reavers), and you'll find a
Venom Halberd, a
Staff of Power, and an
Amulet of Will +6 on the reaver remains. It still won't be safe to rest in the vale, but you'll be able to rest in the
Inner Sanctum, and so you should head there right away (via Exit A).
1 - Starting Point
You'll have to fight lots of bone spiders in this first part of the vale.
2 - Locked Doors
You'll find three locked doors in the vale. To open them, you'll need to pick them, bash them, or knock them. You won't find any keys for them.
3 - Black Fog
The black fog here (#3) will take you to the west (#3a).
4 - Daerred's Adventuring Troupe
If you lied to Daerred and sent him and his companions to their deaths in the Mere of Dead Men, then you'll find them waiting for you here. This encounter is sort of odd, since Daerred and his friends won't look undead, but you'll probably have already stumbled over their corpses at the
Circle of the Mere. In any case, Daerred et al won't drop anything when they die.
5 - Blade Golem Ambush
When you enter this room, five blade golems will appear and attack you.
6 - Black Fog
The black fog here (#6) will take you to the east (#6a).
7 - Nightwalker
You'll face another Nightwalker here (#7). This Nightwalker will probably be more difficult to kill than the last one, simply because you'll probably have fewer spells available for dealing with it. But just whack it with melee attacks, and have Ammon Jerro use his never-ending supply of warlock spells to damage it (different warlock spells work against different things, but "eldritch doom, utterdark blast" seems to work pretty against the Nightwalker). Once the Nightwalker dies, the door to the south (#7a) will open.
You'll also have to defeat numerous greater shadows in this part of the vale.
8 - Vampire Attack
You'll face several vampires and shadow priests, plus a lich, in this part of the vale.
9 - Black Fog
The black fog here (#9) will take you to the north (#9a). You'll be attacked by five mummy lords when you arrive.
10 - Shadow Reavers
You'll face three shadow reavers here.
Exits:
- Passage to the
Inner Sanctum.


