 Did we miss anything in this section? Is there something we didn't discover?
Let us know!
Area Note
Did we miss anything in this section? Is there something we didn't discover?
Let us know!
Area Note
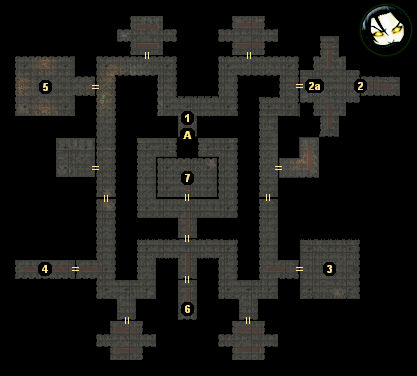
You'll encounter several traps in the tomb, but each one will be outlined on the floor, making them easy to spot. You'll also run into some ghasts. Ghasts are sort of annoying because they can stun your party members using their melee attacks. So try to use spells and other ranged attacks against them.
Walkthrough
1 - Starting Point
2 - Door / Pressure Plate
In order to keep the door (#2) open, you'll need somebody to stand on the pressure plate (#2a). You can achieve this by broadcasting a "stand your ground" command, and then leaving one character on the pressure plate while you move your rogue to the locked and trapped chest beyond the door. You'll also find a lever beyond the door, and pulling it twice will keep the door open, removing the need to keep somebody on the pressure plate. Inside the chest, you'll uncover some random loot.
3 - Arrow Trap Room
This room has several arrow traps in it, each marked by a square on the floor, but you won't be able to disarm them. So after defeating the shadows in the room, tell your party to "stand your ground" and then send your rogue to the chest in the back of the room. You'll find a
Shield of Dawn inside the chest.
4 - Fireball Trap Room
Fireballs will regularly explode inside this room, and you won't be able to disarm them. As with the other trapped rooms in the tomb, the best thing to do here is to broadcast "stand your ground" and then have your rogue run through the traps to the chest in the back of the room. Even if your rogue fails to evade the fireballs and gets killed, since there aren't any enemies around, he or she will just get right back up to try again. Inside the chest you'll find some random equipment.
Note: You might also notice some rats in the room, but it doesn't appear that you can do anything with them.
5 - Stone Block Room
In this room you'll find two lines of pressure plates. If you stand on one of the pressure plates, then a fireball will shoot out of the wall and hit you. You should also notice a lever in the room. If you pull the lever, then you'll move a stone block. The idea behind the room is that you can have one character stand by the lever, and have your rogue travel across the room to the locked chest on the opposite side. Each time your rogue gets to a pressure plate, you can have the character by the lever move the stone block so that it gets in the way of the fireball trap. Thus, you can guarantee that your rogue will make it to the chest without taking any damage.
But just like in the fireball trap room (#4), rogues can evade the fireballs pretty easily (Neeshka will probably only need to roll a 4 or less), and it's easier to just have your rogue sprint across the room to the chest rather than to do all of the lever pulling. Inside the chest you'll find a
Ring of Caitlyn plus some random loot.
6 - Onan of Tyr
Onan is the priest you were sent into the tomb to find. However, when you get to him, he'll tell you that the only way to leave the tomb is to pull a lever that is being guarded by "the greatest of traitors imprisoned in this cursed tomb" (#7).
After defeating the traitor and pulling the lever, when you talk to Onan again, he'll begin following you. No new enemies will appear in the tomb, and so all you'll need to do is walk to the entrance (Exit A) and then leave the tomb. When you do, Onan will automatically run to the Temple of Tyr and tell Judge Oleff about what happened.
7 - Fenthick
You might remember Fenthick from Act I in the original Neverwinter Nights campaign. He inadvertently betrayed Neverwinter, got himself hanged, and ended up down here.
Even with version 1.04, the encounter with Fenthick seems a little buggy. He won't say anything when you approach him, and instead of fighting, he'll simply run around the room. There are some arrow traps that you can't disarm, so you might take some damage while chasing him, but if you have a quality spellcaster or ranger in your party, then it shouldn't take much effort to kill him. When Fenthick dies, he'll drop the recipe book
A Study of the Fantastical Vestments of the Priests of the Realms, 10
Arrows of the Vampire, and a
Shortbow +2.
Also in the room you'll find a lever. Pulling the lever will open up the front door (Exit A).
Exits:
- Exit to the
Merchant Quarter. When you enter the tomb, this door will close and lock behind you, and you won't be able to go through it again until you've pulled a lever in the southern part of the tomb (#7).


