 Did we miss anything in this section? Is there something we didn't discover?
Let us know!
Walkthrough
Did we miss anything in this section? Is there something we didn't discover?
Let us know!
Walkthrough
When you first approach Captain Ballard (#2), you'll witness a cutscene where Lord Tavorick will send away a woman named Melia -- and then seem disappointed when he learns that Lord Nasher has sent him soldiers for protection rather than a harem for entertainment.
When you talk to Captain Ballard, he'll introduce you to his men, and he'll tell you to deal with Tavorick. When you talk to Tavorick, he'll refuse to give up his shard, but he'll go up to his room (#4) when asked. Finally, when you talk to Tavorick a second time, he'll ask you how you want to set up the defenses. From our experience, it doesn't really matter how you position the barricades and the barrels of Blastglobes (#3). The fight will be pretty chaotic regardless, and your casters will probably destroy the barricades and barrels with their spells when you're not looking anyway.
When you agree to go upstairs and protect Tavorick, that's when the fighting will start. A green mist will appear in the estate, and soon enough you'll be called back downstairs to investigate. It's best to leave two guards upstairs with Tavorick when you leave. That should increase his chances of surviving.
When you return downstairs, monsters will finally appear. In the first wave of attacks, you'll have to battle some fire mephits. In the second wave, you'll have to battle some more mephits and also some succubi and erinyes. After the second wave, you'll hear a scream from upstairs.
When you return upstairs, you'll find Tavorick (and whatever guards you left with him) under attack by fire mephits. If you can keep Tavorick alive, then after talking to him again and after receiving the
family crypt key, you'll be given a new objective: to escort him down into the crypt (#6), which has been warded against demons. If Tavorick doesn't survive the battle with the mephits, then he'll make a dying announcement (see below).
You'll have to fight your way to the warded room on the western side of the crypt, and, once you've arrived there, you'll have to fight a massive demon named Qaggoth-yeg. As of version 1.03 there's a bug with the encounter, and the cutscene that starts up when you reach the warded room will repeatedly play. If that happens to you, then all you can do is advance your party towards Qaggoth-yeg as much as possible in between the cutscenes. Eventually, some members of your party should start fighting the demons during the conversation in the cutscene (the demons might not even fight back), and you can just let the battle play out rather than responding to the demon.
Note: During the battles on the first floor, one of the demons might drop the recipe book Codex Necromantica.
Another Note: You'll receive 100 xp for each of Ballard's men that you keep alive.
Tavorick's Announcement...
After you've killed Qaggoth-yeg (or once Tavorick has been dealt a mortal blow), Tavorick will let you know that he doesn't have the shard -- that you and he were used as bait -- while the shard went with Melia to the Moonstone Mask in the
Merchant Quarter. Tavorick will then speculate that the master of the demons might have seen through the ruse, and that you should go to the Moonstone Mask to protect Melia right away.
When you enter the Moonstone Mask, Ophala will come running up to you and tell you that a man with "glowing tattoos on his face" arrived before you and headed upstairs. When you head upstairs yourself, you'll find the place swarming with demons, and, when you reach Melia (in the northwestern room), you'll find her dead with the warlock standing over her. The warlock will summon a pair of nessian war hounds to attack you, and then he'll disappear.
After defeating the war hounds, when you return to Lord Nasher to tell him the news, you'll receive 1500 xp for completing the quest, and 1000 xp extra if you managed to keep Tavorick alive. Then Sydney Natale, the new Luskan ambassador, will show up, and you'll learn that Garius stole an artifact called the
Tome of Iltkazar from Ruathym (which is what started the war between Luskan and Ruathym), and that he plans to use it to perform a ritual that will grant him great power. Lord Nasher will then give you your next quest: to travel to
Crossroad Keep and to stop Garius and his ritual.
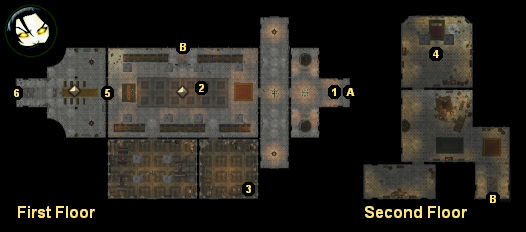
1 - Starting Point
2 - Captain Ballard and Lord Tavorick
3 - Old Barrels
When you click on the barrels, you'll discover that they're full of old
Blastglobes. There isn't any way to loot the
Blastglobes -- if you try and pry open the barrels, then the
Blastglobes will explode, damaging everybody nearby. The only thing you can do with the barrels is place them in an advantageous spot, so that they'll blow up when enemies are around. Talk to Captain Ballard (#2) to have the barrels moved.
4 - Tavorick's Bedroom
You won't be able to enter Tavorick's bedroom until the estate comes under attack.
5 - Chapel Door
You won't be able to open the chapel door until Tavorick gives you the
family crypt key.
6 - Crypt
Exits:
- Front door.
- Stairs between the first floor and the second floor.


