 Did we miss anything on this map? Is there something we didn't discover? Let us know!
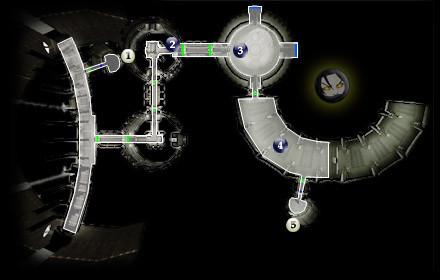
1 - Elevator
Did we miss anything on this map? Is there something we didn't discover? Let us know!
1 - Elevator
Elevator to
Deck 2 (#6). As soon as the elevator stops in the Command Center, you'll have the time to rest and heal as needed. There's another door in front of you and not until you step forward will enemies start to appear.
Fortunately, the Command Center is not as difficult as Deck 2. Though there are roughly the same amount of enemies, your route is shorter; you're only supposed to make it to area #2 and walk through the door. Easier said than done right?
As soon as you open the first door, you'll find troopers and other enemies waiting. If you haven't already, take a look at the solution variations described at
Deck 2 (#3). Of course, if you haven't, you probably don't need to look now. By far the easiest route is to take a single member of your party, use Force Resistance or Immunity coupled with the Burst of Speed line of powers, and run the party member as fast as possible to area #2 where the three Dark Jedi stand guarding the entrance to #3. When they're taken care of, open the door to #3 and run inside.
The best thing about that solution as far as this level goes, is that you won't need your party to be with you when you run through the door; activating the cut-scene there will automatically bring them up. Of course, variation #2 or #3 is equally viable, just not as fast... though you might get more satisfaction from using them. Either way, this level works the same as Deck 2 - many enemies from behind and ahead, and you'll have your hands full if you stay and fight. They do run out though if you play it safe and take your time. Enough said.
2 - Dark Jedi Encounter
Before you reach the door here, you'll encounter three Dark Jedi who are, finally, the last line of defense to a more relaxing yet still difficult run toward the end of the game. Defeat them all, open the door to #3 and run through, and you'll cue another cut-scene. See #3 for Light & Dark variations.
3 - Bastila or Dark Jedi
As far as the Star Forge goes, this is where the Light and Dark paths differentiate slightly.
If you're a Servant of Light:
You'll meet Bastila. You and her will have a little chat and she'll freeze your other companions before battle. During your multiple conversations with her each time she's worn down, you'll have a chance to turn her back to the light side. Either way, once she's defeated the game will remain the same. When fighting her each time, use Force Immunity or Resistance if you have it. Use your stims if you have them as well, and your speed. Then go at her with all you have. She is very easy actually, if you're fully pumped up. You'll have to defeat her (though not fully) at least three times, and four if you don't turn her to the light side. But they all are the same.
If you'd like to save Bastila, here are a few of the conversation choices you'll probably want to use. The first conversation is meaningless, as she'll attack regardless. Even the second will get her to attack you. During the third conversation, tell her that the dark side is not stronger than the light, and that you could never kill her. Tell her to reject the Dark Side, and then persuade her to turn to the Jedi code. Tell her she can atone for helping you with the Sith and that you trust her enough to leave yourself open to her attack. Tell her you know she still serves the light side, and that she could help the Republic by using her Battle Meditation. After this, Bastila should reject the Dark Side and remain in the room using her Battle Meditation, and urge you on to defeat Malak.
Alternatively, if you're male and have followed the romantic path with her, you can eventually tell her that you are "in like" with her. That will get her to slap you. Just kidding. Tell her you love her.
When she's defeated or has turned to the Light Side, continue on to area #4.
If you're the next Dark Lord:
This should be easier than the fight against Bastila. There are three Dark Jedi who appear here and mean to take you apart. It's not an easy battle, but shouldn't be noticeably tougher than any of the previous fights against multiple Dark Jedi. Use your force powers and they won't be a match for you. Best of all, you'll have your other party members to help. When they're defeated, head through the south door to area #4.
4 - Forge Droids
There is an incredibly easy way past this area, but you might consider completing it just for the experience. When you arrive at the door to the #5 exit to the Viewing Platform, Malak will arrive. He'll close all doors and then send six forge droids to attack you. They are all lettered A, B, C, D, E and F. Likewise, around the perimeter of the room, you'll find computer Terminal A, B, C, D, E and F, and next to each, "Spike Bins" which will be empty at the moment.
During your time on the Unknown World, it is likely that you picked up an incredible amount of computer spikes. They will be very useful in this room. Before attacking any of the droids, throw on an Energy Shield of your own and head to one of the computer terminals around the perimeter of the room. It doesn't matter which letter, but you might want to work your way around the room in an order so that you remember which ones you've been to. Make sure you're out of combat using the 'B' button and activate a terminal to see how many spikes you have. You'll have a couple options at each terminal, but only one is really pertinent to the task of getting rid of the droids.
See how many spikes is required for you to disable the droid generator for that terminal. Divide the total number of spikes you have by six, since there are six lettered terminals and you must disable the generator at each. If you have enough, simply walk/run around to each terminal without first killing the droids and disable each of their generators. Once that's done, the door to the Viewing Platform will open and you'll be getting ready for the final battle.
If you're missing a lot of spikes, walk around the room disabling terminals until you run out. Now begin attacking the droids. For each lettered droid that you destroy, exactly one computer spike will appear in the Spike Bin of the same letter, and another droid of the same letter will then reappear at that letter's generator very soon after. When you have enough spikes to disable another generator, do so and you'll have less droids to deal with. Continue killing them until you reach the required number of spikes for the final generator. Disable that and the door Malak went through will be open to you.
Now here's the easy way. I saved it for last because it is somewhat of an exploit allowing you to disregard this room entirely, and exploits are not really what this walkthrough is about. It is meant to help you with completing the game as it was meant to be played. Instead of battling the droids and going to each terminal, you can simply "bash" the door that Malak went through to open it and follow him. It's that easy. When you're ready, head through the exit at area #5.
5 - Exit
Exit to
Viewing Platform (#1). You'll have some time to rest and heal before the final battle once you go through the door, but a saved game before opening and going through it might come in handy later.


