 Did we miss anything on this map? Is there something we didn't discover? Let us know!
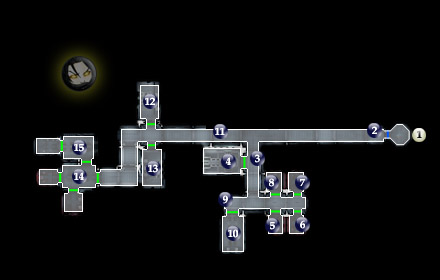
1 - Elevator
Did we miss anything on this map? Is there something we didn't discover? Let us know!
1 - Elevator
Elevator to
Command Deck (#1) (labeled "Bridge"), Prison Block #1 (this area here, labeled "Cell Block") and
Hangar (#1). When you first arrive on the Leviathan, you're goal is to free your other party members in the detention area at #14. Only after you do that can you access this elevator. To accomplish that, you'll need to open the Detention Block via the computer at area #4 or with a passcard from area #10. After rescuing them, come back here and select "Bridge."
2 - Juhani's Starting Position
If you've selected Juhani as your rescuer, she'll start right here. She's one of the easiest to characters to make it through the mission, as she'll not only start with all of her equipment on (lightsabers included), but has her unique force stealth power and her other force powers to boot. It's a breeze with Juhani. Just make sure she's not stealthed when you use the Detention Terminal at #14, due to the crash bug in the Xbox version.
3 - Sith Guard
This guard, depending on which character you play, might pose a slight threat. For instance, if you're T3-M4 who starts in area #12 but has only what you give him, and if he's weaponless when you begin, he'll have a tougher time getting past the guard. For any character who's defenseless, run past him to area #9 and open the footlocker labeled "Riot Equipment," which has the swords and blasters you need. Jolee is in the same position but he can rely on his force powers to take most of them out. Nevertheless it would be a good idea to run to area #9 and equip your party if needed.
On the guard's remains is a useful Cell Block Key, which can unlock any cell in areas #5, 6, 7 and 8.
4 - Technicians & Brig Terminal
Aside from the Technicians you'll need to deal with here, this is one of the solutions to rescuing your party. In the back of the room in a container are some helpful computer spikes. It takes a fair amount to "open the detention" area, but there's one very easy way around this. By now you've probably dealt with the guard at area #3. You can use his cell block key to open the cell at area #7, releasing the Rodian inside. He'll give you something called an "ICE Breaker." You can use that to freely access any command in this computer, even though it will say you need spikes. You can also get a fair amount of xp for trying out all the system functions on the terminal.
The other way into the detention area is to find the footlocker at the back of area #10 and get the Sith Passcard inside. Only, there are a lot of guards in the room, so if your character doesn't have stealth, or can't fight well, slicing this computer is your best bet.
5 - Jolee's Starting Position
Technically, he starts just outside the cell, but in the cut-scene he's there at first. Jolee is probably the easiest character to get through the Prison Block here. His force powers are very hard to beat, and by now he's probably very powerful. At first, though, he won't have a weapon. You can find a long and short sword at area #9 in the footlocker labeled "Riot Equipment," along with a pair of blasters. Use whichever suits him best. He might have to run past the Sith Guard at area #3 first, but if you catch the guard at the north end, he won't notice Jolee on your way to area #9.
6 - Mission's Starting Position
After witnessing her open her cell, Mission will start without any equipment. Fortunately, there's a small cache at area #9. In the footlocker labeled "Riot Equipment," you can grab her a pair of pistols, and in the Contraband container there's a handy Stealth Field Generator she can equip. First you'll have to make it past the guard at area #3, and that can be slightly risky without the stealth. But once you get the weapons you should be okay, even if he's firing at you.
7 - Rodian Prisoner
As you walk in front of his cell, he'll ask to be released, upon the promise of a reward. That reward is one of the ways into the Detention Block at area #14. There are a few ways you can open the cells. You can simply bash them, or you can use your security skill (ala Mission), or you can get the Cell Block key off the Sith Guard's remains at area #3... once he's dead. Release this prisoner and he'll give you an "ICE Breaker." It can utilize every function of the Brig Computer at area #4, including opening the detention area.
8 - Insane Rodians
For easy xp, if you've got a character that can fight, you can open the cell door here to fight three insane rodians.
9 - Riot Equipment & Contraband
This is the place to go first if the character you've chosen happens to be unequipped with weapons of any sort. Inside the footlocker labeled "Riot Equipment," there's a long and short sword, a pair of blasters, and more useful things. In the Contraband container, you'll find a
Hair Trigger upgrade item, a handy Stealth Field Generator if you're using Mission. Be sure not to have Mission stealthed at area #14 when you use the computer, as there's a crash on the Xbox version of the game. Also within are a few Pazaak cards.
10 - Sith Troopers & Sith Passcard
In a footlocker at the back of the room is the other way into the Detention area to rescue your party. There's a Sith Passcard inside. First, though you'll have to kill the Sith Troopers inside or use Stealth to take the Passcard from the footlocker, avoiding a fight. They're a lot easier than most of the Sith Troopers you've dealt with, partly because you're likely so shorthanded equipment wise, so don't expect a very difficult fight. Jolee, Canderous, HK-47 and Juhani should have no trouble with these guys. Mission or T3-M4 might have a little, but it shouldn't be bad. You can use the passcard on the door to area #14, and then use the terminal there to open the detention cells. The other way is by using the Brig Terminal at area #4 to open the Detention block, explained at #4.
11 - Sith Heavy Trooper
Because Juhani's fully equipped when you start this mission, the Sith Heavy Trooper will only show up here if you've chosen her as your character. She can use stealth to pass him, but it's worth it to kill him, though he's by far the toughest one on this level to fight. On his remains is a
Plasma Grenade.
12 - HK-47 & T3-M4's Starting Position
If you've chosen HK-47 as your character, he'll begin with a small battle with one easy Sith inside the room. If you're unequipped for the fight or if you're concerned I'd suggest picking up the upgrades in the Droid Upgrades container, equipping the Advanced Flame Thrower and making a run for area #9 where HK-47 can equip himself. That will mean running past the guard at area #3 first but the Flame Thrower can take care of him.
If you've chosen T3-M4 as your starting character, he'll have a tougher time to begin with, as you'll need to solve a puzzle or have your whole party die. A droid will be working on T3 and if you can slice past the droid's defenses, it will blow up. Three progression puzzles will appear and if you get any one wrong, you'll need to reload. Here are the answers:
Puzzle a) 34, 21, 13, 8, 5... ?
The answer is 3. Each number subtracts from the number to its left to make the one to its right.
Puzzle b) 00, 11, 01... ?
The answer is 10. Binary code, the only missing value.
Puzzle c) 2, 3, 5, 7... ?
The answer is 11. Prime numbers.
Once you've answered them, the hostile droid will blow up and T3-M4 will be free! If he doesn't have a weapon yet, gather up the gear in this room, and use the Advanced Flame Thrower on any guards on your way over to area #9 for the blasters in the footlocker labeled "Riot Equipment."
Before exiting the room, be sure to search the Droid Upgrades container for an
Advanced Flame Thrower,
Advanced Stun Ray, and
Droid Motion Sensors Type 3. Also check the footlocker for more. In the right back corner of the room there's a decommissioned droid that you can repair and set to patrol mode for xp and a little help, if necessary.
13 - Canderous' Starting Position
When you first get Canderous, search the "Patient Gear" container at the back of the room for his personal repeating blaster (and/or whatever he had equipped when you last used him). That, along with his regeneration ability, will give him more than enough firepower to kill any Sith in his way. In a locker within this room, you'll find a
Retinal Combat Implant and
Nerve Enhancement Package.
14 - Detention Area & Terminal
The only way in here is by opening the door with the Sith Passcard you can get in a footlocker in area #10, or by slicing open the detention area with the Brig Computer at area #4. See the respective areas for details.
Once again, a warning for Xbox users. Do not use the Detention Terminal if you're using Juhani or Mission and they're in Stealth Mode. Unstealth them before opening the cell doors, otherwise you'll get the infamous crash.
When you're ready, simply use the Detention Terminal and open the cell doors for your party members, and you'll see a cut-scene. Afterward, you'll be stuck with Carth, Bastila and yourself as the party and you'll regain control in the Equipment Storage area at #15.
15 - Equipment Storage
After you release your party members using the Detention Terminal at area #14, you'll find yourself here, along with Carth and Bastila. Both of them will already be equipped, but all of your gear along with all of the party gear you've so far collected will be in a locker on the southern wall. In an adjacent locker, you'll find the nice sum of 2000 credits. Finally, on the floor in a belt labeled "Bandoleer," you'll find a
Mandalorian Assault Rifle.
Now that you've got your party re-equipped and rescued, it's time to head back to the elevator at area #1, and select the "Bridge" option. It will actually take you to the
Command Deck (#1), and will be your only choice.


