 Did we miss anything on this map? Is there something we didn't discover? Let us know!
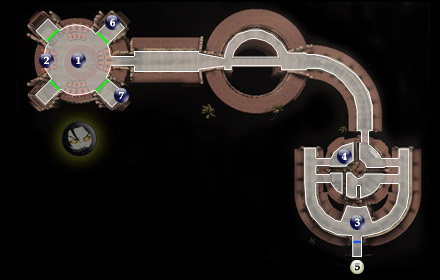
1 - The One
Did we miss anything on this map? Is there something we didn't discover? Let us know!
1 - The One
Assuming you accepted the Rakata's invitation at
North Beach (#2) and are not yet hostile to the group of Rakata here in the settlement, you'll be brought to see The One. If not, begin at area #5 on this map, and work your way back up.
After introductions and establishing that you're actually not the same Revan as before, The One asks you to go to the Elder Settlement and bring back an "ancient tome" to him, as you promised to do on your last visit. In turn, he'll help you into the Ancient Temple. If you're playing Light Side, The One's proposal might make you a bit uncomfortable, as you probably won't know who these Elders are that you're supposed to slaughter. Use up all the topic choices during this conversation with the One except the "Forget it..." line and you may then tell him that you'll help him get the tome without fear of Dark Side points; lie or tell the truth, it doesn't matter. The ancient tome happens to be on Keeper Orsa at
Elder Settlement (#4).
Your other option is to get mad or say "forget it." This will make The One and the whole settlement attack. The One will open the cages with the four young rancors, and they'll all attack. It's a pretty big battle, and you'll have to do it eventually... but there is more to be gained from doing it later, than now. Remain friendly with the tribe if you want some good items later and more xp.
After your initial conversation with The One, you'll get 1000xp and then say farewell. When you eventually get to the Elder Settlement off of South Beach, you'll have a choice to ally with them or fight them for the ancient tome that The One wants. The Light Side path is to ally with the Elders, who will assign you a task here at the Rakatan Settlement (which will then be hostile to you), and seek their help with entering the Ancient Temple. The Dark Side path is to slaughter the Elders and bring the ancient tome back to The One, who will help you inside.
After Speaking with the Elders or Being Hostile to this Rakatan Settlement:
If you're hostile already or have come on a mission from the Elders to rescue one of their prisoners (at area #6), you'll have to do battle with The One. He'll begin by opening the young rancor pens at each end of the diagonals of this area, and you'll have a fairly tough battle ahead of you. The One is powerful, but not very resistant to force powers, so use them. Make the four young rancors your first priority while attempting to incapacitate The One.
When it's over, if you've come for the Elders to rescue the prisoner, you'll get 1000xp for the quest, plus the good xp for his death. The One drops a special powerful vibrosword simply named "vibrosword" but we'll name it The One's Vibrosword. If you're simply hostile to him from the get go, you'll not know about the prisoner yet, but can still rescue him at area #6. If you haven't already, be sure to check all the wicker bins and containers at area #2 for lots of incredibly useful items. Now go to area #6 and rescue the prisoner, and see area #7 for one of two places to find "ship parts" to fix the Ebon Hawk.
If you've brought back the Ancient Tome from the Elder Settlement:
If you're playing this quest from the Dark Side angle, and have slaughtered the Elder Settlement to find the ancient tome at Elder Settlement (#4), bring it back to The One for 3000xp and his help with entering the Ancient Temple. When you're ready, you'll have to first agree to enter the Temple alone. You have no choice. Your next step will be meeting them at the Temple Exterior (#5) for the ritual to bypass the Temple's energy shield. See the link for details.
2 - Rakatan Settlement Item Cache
Search all of the wicker bins and containers in this area for possibly the biggest assemblage of useful items in the game. Don't miss these.
3 - Luo, Curious Rakatan
Here's your chance to be Obi Wan. You can coach Luo in the ways of the force (if you're still friendly to the settlement), and he's eager to learn, but other than a few dialogue options, that's about all you'll get from him.
4 - Loremaster Gjarshi
This is a good opportunity for xp if you're friendly to the Rakatan Settlement. Speak with Gjarshi, and start by asking him to tell you about the history of their people. Ask him about every topic when he's relating the history, and you'll get at least 1600xp for listening to it all.
5 - Exit
Exit to
North Beach (#3). Before you leave, or when you enter, check all the wicker bins and footlockers within the settlement here for very useful hyper-stims and other items.
6 - Elder Prisoner: There is an Elder being held captive in this rancor pen, and the only way to him is to eventually become hostile to the Rakatan Settlement. Most likely, you've received the quest to rescue him from the Elder Councilor at
Elder Settlement (#2). If you're simply hostile to the settlement from the beginning, The One at area #1 will have opened these pens and you can then save him after the battle. If you've got the quest from the Elders, then after the battle with The One and rancors you'll get 1000xp for his rescue.
7 - Ship Parts
One of the two replacement "ship parts" you can find to repair the Ebon Hawk is right here. The other is at
South Beach (#3). You'll only need to find one of them. The only way to this pair is if you've become hostile toward the Rakatan Settlement, either by necessity while allying with the Elders, or from the beginning. See
The Ebon Hawk (#1) under the "Replacement Ship Parts" quest for more details.
 Did we miss anything on this map? Is there something we didn't discover? Let us know!
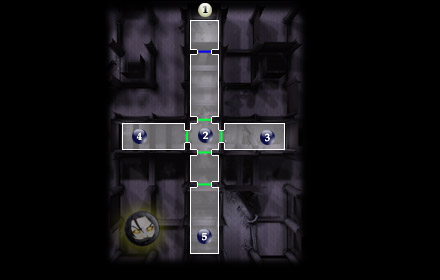
1 - Exit
Did we miss anything on this map? Is there something we didn't discover? Let us know!
1 - Exit
Exit to
Courtyard (#9).
2 - Ancient Droid & Remains
Stepping into this central hub area, you'll encounter a non-hostile Ancient Droid (and be rewarded 300xp for ending the conversation with it). Speak to the droid and it will fill you in on the mysteries of these ruins, an ancient race of beings and the Star Forge - but not all the mysteries. For instance, it neglects to tell you how to enter the southern door (area #5 containing the Star Map) that Revan and Malak came through, except that you must be deemed worthy. How? You have to pass the trials in the rooms beyond both the east and west doors before the southern door will open. Take them in any order you wish, as they both present very similar challenges.
Before you go, there's the remains of one "Nemo" on the ground in this room. Yes, he's the one you passed by (and perhaps talked to) back in the
Courtyard (#2). Search his remains for a nice
Sigil Crystal lightsaber upgrade, and your first
Jedi Robe.
3 - Guardian Droid & Ancient Terminal
As soon as you enter, you'll be targeted by a "Guardian Droid," a very powerful droid with weak attacks. Using your lightsabers and blaster rifles, this battle would be a nightmare. Fortunately, all you need do is use your vibroblades, and it slices through the droid's defenses quite nicely and in record time. Another way to disable the droid's shields is to run past it to the ancient terminal and shut it down, but if you carry vibroblades, that shouldn't be necessary. After it's defeated, approach the Ancient Terminal in back, and "talk to it." Now insert your datapad when the option presents itself. Finally, talk to it again. You'll be presented with a puzzle: "identify three primary life-giving seed world types." There is a list of six options. The three will most likely be obvious to you, but here are the answers anyway:
Oceanic
Arboreal
Grassland
Once that's done, you have successfully completed the challenge in this room. Check the nearby wreckage in front of the terminal for items if you like. If this is your first room, proceed to the west room. Otherwise, the southern door will now be open to you.
4 - Guardian Droid & Ancient Terminal
As with the droid at area #3, use your vibroblades and ion weapons to easily break through its defenses; using lightsabers and blasters will take you all day. Like before, the other way to disable the droid's shields is to run past it to the ancient terminal and shut it down. When it's reduced to rubble, activate the Ancient Terminal at the back of the room. Like with the other terminal, talk to it. Now insert your datapad. Finally, talk to it again. You'll be presented with a puzzle: "identify three primary death-giving seed world types." If you've completed the previous room, this will be a snap. Even if you haven't, the answers will probably jump out at you:
Desert
Volcanic
Barren
Now that you've successfully defeated the Guardian droids in both rooms (and if you haven't, see #3), head back into the hub area at #2 and proceed through the now open southern door.
5 - Dantooine Star Map
Finally, you've made it to the last part of the final quest on Dantooine. After this, it's an open galaxy ahead (well, four planets is quite a lot to explore). Enter the southern chamber and watch as the device folds open to reveal a holographic map of the entire galaxy. Bastila comments on the whereabouts of four of the planets, yet other data seems to be missing. You both figure that by journeying to these four planets and finding the Star Map on each one, you'll recover the missing data and piece it together, which will lead ultimately to the Star Forge. Go now and speak with the Jedi Council. You can teleport back to the Ebon Hawk or journey on foot. Take a good look around, as this will probably be your last visit to the wilds of Dantooine!
When you've spoken with the council, they'll give you orders to search the four planets Tatooine, Kashyyyk, Manaan and Korriban in an effort to find the location of the Star Forge. Enter the Ebon Hawk, find the galaxy map in the Bridge - see
The Ebon Hawk (#2) - and select your planet of choice. On the way out, you'll get a chance at your first space battle. Simply aim the turrets and fire both the left and right triggers, using the bottom left radar to help locate the remaining ships. Never let off firing if you think you're close to an enemy ship and you'll destroy them faster. It's about as easy a mini-game as they come - just be patient.


