 Did we miss anything on this map? Is there something we didn't discover? Let us know!
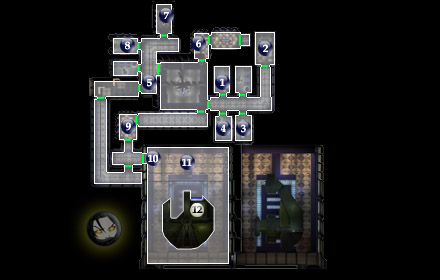
1 - Your Quarters
Did we miss anything on this map? Is there something we didn't discover? Let us know!
1 - Your Quarters
This is where you'll begin your stay after the tour from Davik. As he says, you're free to roam around the rooms and Slave Quarters (area #2), but beyond that you'll be dealt with. Fat chance of that happening. Your goal is to steal Davik's ship, the Ebon Hawk, and fly away. You'll first need the security codes to break into the ship. The "Guest Room" at area #7 will help with the task.
2 - Slave Quarters
If you're male, you can indulge in earthly pleasures with the slaves. They'll also give you some info about the Estate. If you're female playing the Xbox version, tough luck. However, in the PC version, there's also a male slave who will divulge info about the prisoner here if you're persuasive enough. This is not a required step, but simply an alternative way to find out what's going on here.
3 - Empty Room
There's some decent items inside the footlocker here: a
Hair Trigger and +/- 1, -2 and -3 Pazaak cards.
4 - Bounty Hunter, Easily Annoyed
Upon entering the room, this Bounty Hunter will ask what you're doing. If you manage to peacefully persuade him out of calling the guards, nothing happens. Otherwise, he'll alert the guards and you'll have both him and two guards to deal with... nothing too much for you to handle, especially since you're about to confront them on your own anyway.
5 - Bounty Hunter, Openly Hostile
The rodian roaming this hallway holds a computer pass card which you can use to log on to the two computer terminals in the Estate for free. You'll still have to use computer spikes to access any system commands other than the required disabling of Hangar security at area #10.
6 - Security Terminal
Here's one of two security terminals in the Estate. You'll need one of these to disable the Hangar security and pass through the door at area #10.
7 - Hudrow the Tortured
The map says this is the "Guest Room". Inside you'll find two hostile torture droids and the tortured Hudrow held captive in a cage. Release him with the "cage release" at the back of the room, and he'll give you the needed Hawk security codes. Now all you need to do if you haven't already is disable Hangar security using one of the two security terminals in the Estate: one's at area #6 and another at area #9.
8 - Tarisian Noble, Easily Annoyed
Like the Bounty Hunter at area #4, he'll summon two guards unless you manage to calm him down using your persuasive prowess. At the back of the room, you'll find a strong box including: 500 credits and
Armor Reinforcement.
9 - Security Terminal
There are a few guards in the room, but these guards are not a match for you and your party. You can use this terminal to disable the security to the Hangar door.
10 - Hangar Access
You won't be able to pass through the door until you've disabled its security via a security terminal. There's one at area #9 and another at area #6. The Bounty Hunter at area #5 has a security pass card that allows you free access to the terminals. Otherwise you'll need to spend computer spikes.
11 - Calo Nord and Davik Kang
Here's your final battle on Taris. After some initial words with the two over-confident scumbags, you'll begin the fight. Calo will begin by tossing a grenade your way. Remember that for the future. Be ready to run clear of the grenade, and to enable your energy shields. You can even help by tossing a grenade or two of your own. Then move in close. Davik is the only other opponent and he will switch to a melee weapon. Concentrate on Calo Nord using vibro melee weapons.
When Calo's vitality hits around one fifth of his total, a cut-scene will happen. Malak's assault on Taris has begun, and Davik will lose his life from the roof caving in. Calo too, after the brief conversation, will appear to have lost his life. Now you're free to run to the Ebon Hawk and get off Taris! But first search Davik's remains. You'll find two nice items:
Davik's War Suit and
Davik's Visor. Now board the Ebon Hawk.
12 - The Ebon Hawk
During your escape, you'll be attacked by Sith ships, so you'll have to man the Hawk's gun turrets. This is another mini-game and it's relatively easy. Simply continually press the right and left triggers to fire the lasers, and keep a watch on the radar on the lower left of the screen. The little dots represent the ships left remaining. Swivel your turret so that the tiny dots are on the north end of the radar, wait until they come close and blow them away.
After the battle, you'll speak with Bastila and end up agreeing to settle down on Dantooine for a brief rest. Your next destination: the
Jedi Enclave (#1) on Dantooine!


